Headers/Footers and Margins
Headers/Footers and Margins
The most basic information about headers and footers is that they both do close to the same thing, just one at the top of the page, and one at the bottom (I’ll let you figure out which one is which). When you insert text into a header or footer, it will automatically appear on the same location for every page inside your document.
To access the headers, doubleclick the top of a document; footers, doubleclick the bottom. After doing so, you should open up a little space. We’ll start with the header.
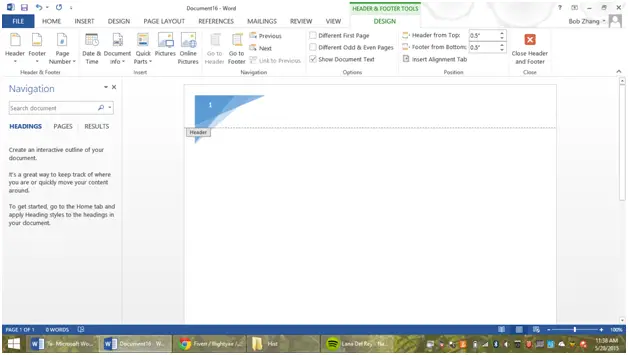
The header is used usually for placing your name or other information, like page numbers. As you can see, there is a design tab for the headers. You can insert page numbers, which are automatically numbered, into it.
As the picture shows, you can also put the date/time, pictures, and many other things into the headers/footers. The key thing to note here is that if you just type something into the header, it will copy the exact same thing to every page. If you want page numbers, for example, you have to utilize the Page Number button on the top tab.
Aside from those, you can also use templates for headers and footers. To do so, click on the little drop-down menu underneath the header/footer button.
This will open up a list of possible templates for the footer/header, and they function identically to document templates, just geared towards headers and footers. Here, I am using the “Facet” template for the header.
Another thing you can do to change the overall layout of your page is by changing the margin sizes. To do so, click on the “Page Layout” tab, then click on “Margins”. Here, you can see a lot of offered margins. Here we have the regular, normal margin that would be used for any blank template-
And here we have the “Narrow” margins-
These margin sizes will be used for different documents. For example, a brochure will require a much smaller margin than an essay, or a resume maybe wanting a larger margin for a more spacious look. Either way, changing the margins is a nice way to edit a document.
In this lesson we covered both how to utilize headers, footers, and also how to change margins. These are typical ways to edit large amounts of text at once. Our next lesson will cover more shortcuts for fast and efficient editing/organization in a Word document.
More Related Articles For You
- Creating a New Document and Templates
- Using Fonts, Spacing, Sizes, and Other Word Modification Techniques
- Text Editing (Bolding, Highlighting, etc.)
- Insertion and Modification of Pictures
- Graphical Organizers – Creation and Usage
- Shortcuts and Organizational Tools in Word
- Collaboration Tools
- Printing Techniques/Sharing


