How Do I Take and Upload Photos on Instagram
Instagram – Taking and Uploading Photos
When you start making a post on Instagram, you have two options. You can either upload an existing photo or take a new one. It’s easy to accomplish both of these tasks and it won’t take you very long.
Taking a Photo
1) Open your app and click on the camera icon. This icon is found at the bottom of the screen in a row of five different icons.
2) In the next screen, you will see a row of options at the bottom. Tap on the one that says ‘photo’ found in the middle.
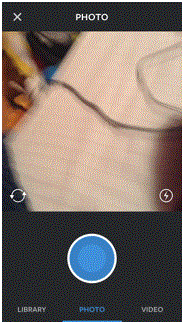
3) In the photo screen, you will see a big blue circle near the bottom. At the top, you will see the frame in which your picture will be. At the bottom left corner in the frame of the picture, you will see an icon that looks like two arrows moving in a continuous circle. Tap on it to switch to the front facing camera. In the opposite corner, you will see an icon with a circle and a lightning bolt inside it. Tap on that to change the focusing ability of the camera.
4) Tap the blue button when you’re ready to take the picture.
Uploading a Photo
1) Tap on the option that says ‘library’ after clicking on the camera icon.
2) In the top half of the screen you will see the photo that is currently selected and the frame that it will be in. In the bottom half, you will see all of your photos from your phone’s library.
3) Select the photo that you want to use in your Instagram post and then click ‘next’ in the top right corner of the screen.
After you select your photo, you can edit it in any way that you like. Instagram provides a plethora of options. When you’re happy with it, you can share it with your followers.
Read more
- What is Instagram
- How to Create an Instagram Account
- How to Promote Your Instagram Profile using Badges
- How to Take Backup of Photos on Instagram
- How do I Edit Photos on Instagram
- How to Share Videos on Instagram
- What is Photos of You Feature in Instagram
- How do I Reset Instagram Password
- How to Enable Post Notifications on Instagram
- How do I Change my Profile Picture on Instagram
- How do I Change my Instagram Password
- How do I Copy the URL of an Instagram Photo
- How do I Delete Comments on Instagram
- How do I Delete Photos on Instagram
- How do I Rotate a Photo on Instagram
- How do I Share Photos with Friends on Instagram
- How do I Clear my Instagram Search History
- How do I Share Photos with Specific Friends on Instagram
- How do I make my Instagram Account a Private Account
- How do I Use my Instagram Account for Business
- How Do I Post a Photo on Instagram
- How do I Use Hashtags on Instagram
- How Do I Straighten an Instagram Photo
- How Do I Add a Caption on Photo Before Sharing on Instagram
- How Do I Apply Filter On Instagram Photos
- How Do I Apply Effects to Instagram Photos
- How Do I Approve Follower Requests on Instagram

