How Do I Straighten an Instagram Photo
Straightening an Instagram Photo
With Instagram, you have many options to edit your photos and make them look perfect. There are many filters and effects for you to try out. You can edit the same picture as many times as you want and in many different ways.
Don’t hold back with your creativity and explore the options available to you. One of those options is for straightening out a photo. You can find that option among many of the other effects.
1) First, go to your app and click on the camera icon at the bottom of the screen. Select a photo or take a brand new one, and then tap next in the top right corner of the screen.
2) On the next screen, you will see a row of three icons below the photo you selected. Tap the one on the far right. It looks like a wrench with a circle around it.
3) After tapping it, you will see all of your effects options below, all lined up in a row. The one you want right now is titled ‘adjust.’ It is the first option on the far left.
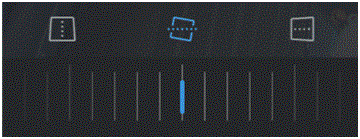
4) Now below the photo, you will see three new icons. The one meant for straightening is the box in the middle. It looks like it is tilted to the right and has a dotted line through it.
5) Below that icon, you will see a vertical blue line. Hold that line and drag it to the left or right. As you move it, the icon will change to show the degree that it has been altered. If the photo is perfectly straight, you will not see any numbers appear.
6) When you’re happy with the final product, press the checkmark in the bottom right corner of the screen. Have fun with the other effects and then post it when you’re ready.
Read more
- What is Instagram
- How to Create an Instagram Account
- How to Promote Your Instagram Profile using Badges
- How to Take Backup of Photos on Instagram
- How do I Edit Photos on Instagram
- How to Share Videos on Instagram
- What is Photos of You Feature in Instagram
- How do I Reset Instagram Password
- How to Enable Post Notifications on Instagram
- How do I Change my Profile Picture on Instagram
- How do I Change my Instagram Password
- How do I Copy the URL of an Instagram Photo
- How do I Delete Comments on Instagram
- How do I Delete Photos on Instagram
- How do I Rotate a Photo on Instagram
- How do I Share Photos with Friends on Instagram
- How do I Clear my Instagram Search History
- How do I Share Photos with Specific Friends on Instagram
- How do I make my Instagram Account a Private Account
- How do I Use my Instagram Account for Business
- How Do I Post a Photo on Instagram
- How Do I Take and Upload Photos on Instagram
- How do I Use Hashtags on Instagram
- How Do I Add a Caption on Photo Before Sharing on Instagram
- How Do I Apply Filter On Instagram Photos
- How Do I Apply Effects to Instagram Photos
- How Do I Approve Follower Requests on Instagram


