How to Manage Notifications on Facebook Page
Managing Notifications on a Facebook Page
When you run a Facebook page, it can get overwhelming at times. It’s especially difficult when you’re overrun with notifications. You may not be able to keep up with them all or they’ve just become a nuisance because you’re constantly receiving notifications. Sometimes there isn’t a need for a notification, especially when you’re already logged into Facebook. To control your notifications, follow these steps.
1. Start by going to your Facebook page. You may find a link to it on the right sidebar of the Facebook homepage. It’s possibly under ‘favorites.’
2. Once there, click on the ‘settings’ option at the top right corner of the page.
3. There will be a list of tabs on the left side of the screen. The fourth option down from the top is called ‘notifications.’ Click on that and view your options on the right side.
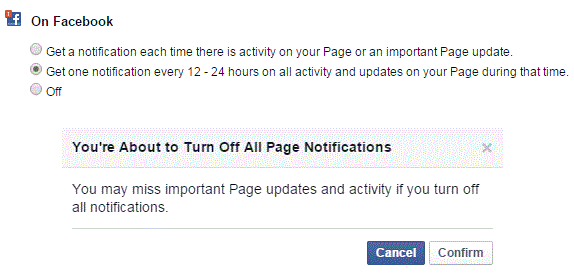
4. The top option is for notifications on Facebook. Decide the frequency of these notifications or turn them off entirely. Simply click on the circle to the left of each option and it will save. First, you have to confirm the change in the new window that appears by clicking ‘confirm.’
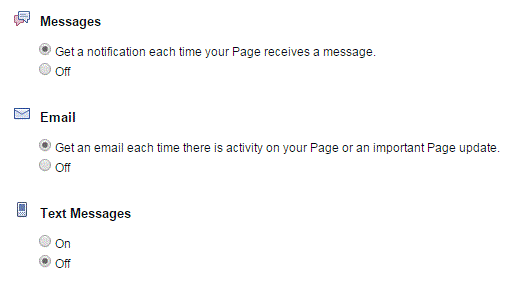
5. The subsequent options are for messages, emails, and text messages. Turn these notifications on or off by clicking the circle beside it. These changes will automatically save without a confirmation window.
Once you’re done making your notification decisions, leave the page and everything will be set. You can go back and change them any time. Not everyone likes to be notified about everything that happens when they’re not on Facebook. You have the power to minimize or maximize those notifications if that’s what you want.
Facebook is packed with settings options for pages, profiles, security, and much more. On your Facebook page, make sure you’re familiar with the settings. It’s your page and you can set it up however you’d like.
Read more
- How Do I Hide my Friends List on Facebook
- How to Save Content on Facebook to Publish Later On
- How to Rename a Facbeook Fan Page
- Facebook Monitoring Access and Disconnecting an Account
- How to Turn On Chat for some Friends on Facebook
- How to Cancel a Sent Friend Request on Facebook
- How to Set Appear Offline Status on Facebook
- How to Enable Video Auto Play on Facebook
- How to Turn off Facebook Chat on Android Phone


