How to Change a Name or Rename a Facebook Group
Changing the Name of a Facebook Group
When you have a group on Facebook, you might want to change some things every once in a while. If you are the creator of the group, you are able to edit everything in the group. If you think the name should change, only you can do it. Changing the name is a quick and easy process which doesn’t take up much time.
1) Click on the name of your group, under the heading ‘groups.’ You can find this heading on the left sidebar of the main Facebook page.
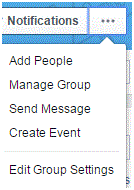
2) Once you’ve been redirected to this group, you will see a button in the top right corner that looks like an ellipsis (three dots in a row). Click on it and you will see a drop down list of options appear. In the middle is an option called ‘edit group settings.’ That’s where you need to click.
3) When you’re on the new settings page, you will see that the name will show up in a text box at the top. The name should be to the right of the words ‘group name’ which are shaded in grey.
4) Click on the box to place a cursor in there and to delete the old name. Then, you have to type in the new name that you want.
5) Once you’ve decided on a name, scroll down to the bottom of the page and click on the blue ‘save’ button.
The name of your group will instantly change. It may take a few moments, but it’s usually very quick. You can view your group’s name in the bottom left corner of its cover photo. When you change the name, that action shows up as a post on your group’s timeline for all members to see.
This is your page so you can edit it exactly to your liking.
Read more
- How to Block a Friend on Facebook
- Reviewing Posts You Are Tagged in Before Displaying Them on Your Facebook Timeline
- How To Turn Off Tag Suggestion on Facebook
- How to Turn Off Audio Notifications on Facebook
- How to Unfriending a Friend on Facbeook
- How to Remove or Uninstall an Application on Facebook
- How to Remove a Tag from a Photo or Post on Facebook
- How to Move Photos from One Folder to another Folder on Facebook
- How to Hide Posts from Your Facebook Timeline


