How to Add a Friend on Restricted List on Your Facebook Account
Facebook – Creating a Restricted List
We all have at least one person on our Facebook friends list that we’d rather not share certain things with. If you’re the kind of person that shares most of your content publicly, you may be wary about certain people seeing it.
Sometimes, you decide to make your posts only available for your friends to see. If there are friends that you don’t want to share something with, there is a way to restrict specific people from seeing those posts.
You will still be friends with them, but they won’t have access to the posts with the security setting of ‘friends.’ Post images and statuses freely knowing that your boss, teacher, or parent won’t see something that you don’t want them to.
1. Go to the profile of the person that you want to put on your list of restricted people. Find their profile by going to your friends list, searching their name in the search bar, or seeing them on your newsfeed.
2. Once you’ve found the right friend, click on their name to be directed to their profile. To the right of their profile picture and in the corner of their cover photo, you will see a button that says ‘friends’ with a check mark beside it. Click on it and a drop down list will appear.
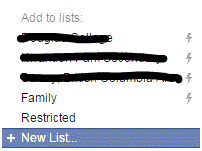
3. Halfway down the list, you will see ‘add to another list…’ Click on that option. A new list will appear of the lists that you can add someone to. Click on the one near the bottom that says ‘restricted.’
4. Once they are restricted, the only posts that they will see from you are the ones that you made public. Click on ‘restricted’ again if you wish to take them off the list.
You have control over what posts you share with which people, so make it count.
Read more
- How to Send a Document, Image or File as an attachment on Facebook
- How to Create an Admin of Your Facebook Fan Page
- How to Display an Online Status on Facebook
- How to Allow Friends to Add Your Email Address in Their Archives
- How to Generate Password on Facebook App
- How Can I Share Dropbox Files on Facebook
- How Can I Delete Photos on Facebook
- How Can I Permanently Delete Facebook Message
- How Can I Schedule Automatic Posts on Facebook Page


