VPN Server Installation and Configuration on Windows Server 2012
VPN Server Installation and Configuration on Windows Server 2012
This article explains how to install and configure VPN Server on Microsoft Windows Server 2012. Free step by step guide for VPN Server installation and configuration on Windows Server 2012.
VPN is Virtual Private Network – it extends a private network by creating a secure tunnel across a public network, such as the internet. VPN is a gateway that allows employees to securely access their company’s intranet, whilst working outside of the office.
Note: To configure a VPN, you require two Network Interface cards in your Server.
Let’s get started.
1. Login to the Test Server.
2. Now login to the server, as shown below.
3. Enter your username and password (ABC\administrator) and click OK, as shown below.
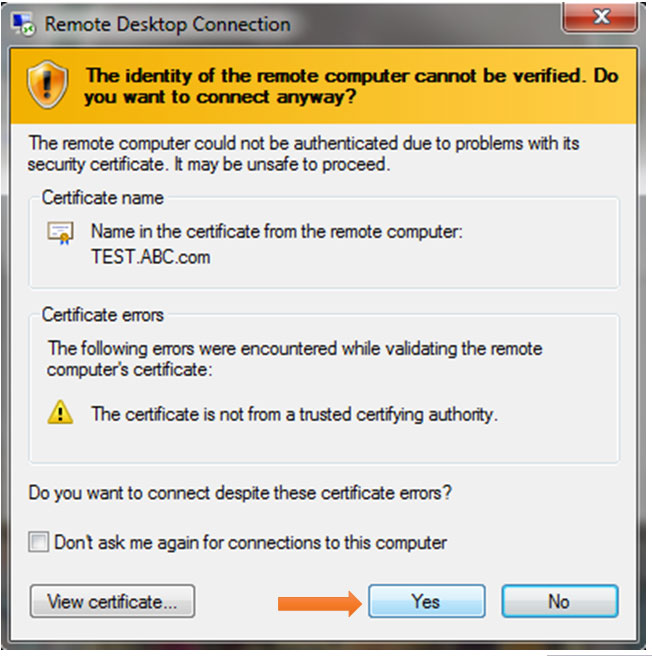
4. On the certificate verification window, click Yes.
5. The next window will show the server desktop.
6. Open the Server Manager from the bottom left corner of the server desktop, as shown below.
7. Click on Add Roles & Features from the Server Manager Dashboard, as shown below.
8. Click Next to begin the process, as shown below.
9. By default, Role-based or feature-based Installation is selected, so simply click Next, as shown below.
10. On the next window, continue with default server (Test) selection and click Next, as shown below.
11. On the Server Roles window, select the Remote Access option, as shown below.
12. When you click on the Remote Access option, it will open another Pop-up window of Add Roles & Features wizard. Click Add Features to continue, as shown below.
13. Click Next to continue, as shown to below.
14. Click Next to continue, as shown below, because we do not require any other features.
15. On the Remote Access Role page, click Next to continue.
16. On the Confirm Install Selection window, click Install, as shown below.
17. Click Next to continue on Select Role Service, as shown below.
18. On Web Server (IIS) Role, click Next to continue.
19. On the Select Role Service, click Next to continue, as shown below.
20. On Confirm Installation Selection, click Install to continue, as shown below.
21. You can see that the Remote Server Installation has started, as shown below.
22. Once the Installation of Remote Server is complete, click Close to finish the setup, as shown below.
23. After installing the Remote Access Server role, open Remote Access Management from Tools in the top right corner of the Server Manager Dashboard. as shown below.
24. The Remote Access Management Console will open and you will see the contents page, as shown below.
25. C lick Run the Remote Access Server Wizard to setup the VPN server.
26. Click on Deploy VPN Only, as shown below.
27. On the Routing & Remote Access window, right-click on Test Server and select Configure & Enable Routing & Remote Access, as shown below.
28. Click Next to continue.
29. As we have to setup the VPN Server, we will select Remote Access(Dial or VPN), then click Next to continue.
30. On the next screen, select VPN, and click Next to continue.
31. Select Network Interface card and click Next.
32. Select the From a specified range of Addresses option and click Next.
33. Add an IP Address range by clicking New, as shown below.
34. Specify the IP address and click OK to continue.
35. Click Next to continue.
36. Select No, Use Routing and Remote Access to Authenticate Connection Requests, then click Next to continue, as shown below.
37. Click Finish to complete the setup.
38. You can see that the Routing & Remote Access Service is starting.
39. You should now be able to see that the Routing & Remote Access Server has been setup.
This is how we will install and configure a VPN Server on Windows Server 2012.
Read more
- Windows Server 2012 System Requirements
- Windows 2012 Server Versions
- Installing Windows Server 2012 on Virtual Cloud
- File server configuration on Windows Server 2012
- Installing Active Directory in Windows 2012 Server
- Installation and configuration of printer server and network printer on Windows 2012 Server
- How to join Computers to a Domain in Windows Server 2012
- User Creation in Active Directory Windows 2012 Server
- How to Configure Group Policy in Windows Server 2012
- FTP Server Installation and Configuration on Windows Server 2012
- Disk Quota Management and Configuration on Windows Server 2012
- IIS Server Installation and Configuration on Windows Server 2012
- DHCP Server Configuration in Windows Server 2012
- DNS Server Installation and Configuration on Windows Server 2012
- Setup Shared Folder Permissions on Windows Server 2012
- WSUS Server Configuration on Windows Server 2012


