CDP Tutorial
CDP Tutorial – Cisco Discovery Protocol Explained with Configurations
The Cisco Discovery Protocol or commonly called as just CDP is a Cisco Proprietary Protocol. It is a Data Link Layer Protocol.
CDP is used to collect and share information about directly connected Cisco devices. The information that is shared is: OS version number, ports, IP addresses, hostname etc.
All IOS based routers and switches have CDP enabled by default on them.
The CDP announcements are multicast to the destination address 01-00-0c-cc-cc-cc, sent out of each connected network interface.
These CDP messages or announcements are sent our every 60 seconds by default.
This protocol is designed so administrators get help and can easily collect information about local and remote connected devices.
Administrator uses this to verify the network diagrams and accordingly correct the network diagrams is any discrepancies observed.
The information about neighboring devices is stored in a table. This information can be viewed using the command: show cdp neighbors
The CDP protocol is very useful in troubleshooting networks and documenting the devices details.
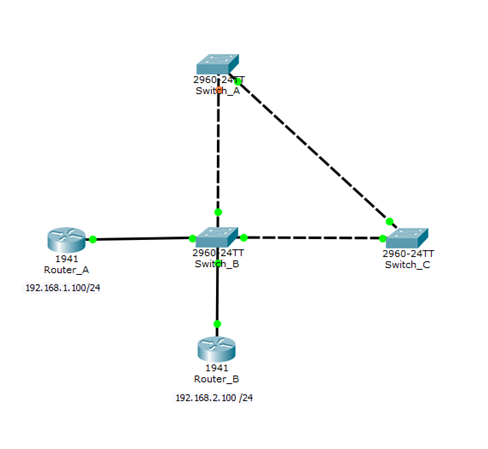
Let’s consider the below topology and try some try some hands on with CDP.
We have the IP addresses preconfigured on the Routers (Router_A and Router_B)
If we go to the center Switch in the diagram, i.e. Switch_B and run the command “show cdp” we get some information related to CDP.
It shows that the CDP packets are sent every 60 seconds and the hold time is 180 seconds, i.e. 3 times the default time (60 secs X3) if the packet or information is not received from the neighbor then the entry corresponding to the cisco device that did not send CDP information is removed.
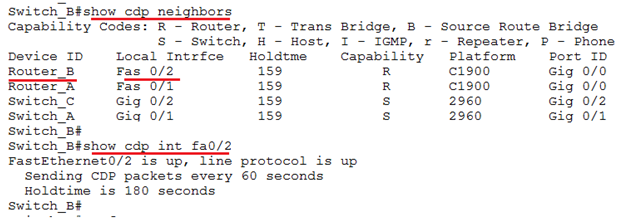
Since the devices are up sine sometime and all the Cisco devices are connected, let us check the next command. “Show cdp neighbors”.
This command gives the details of connected neighbors.
As seen in the topology diagram, there are four devices connected to Switch_B. 2 Routes and 2 Switches.
The information that this command displays is:
1. Device ID : Name of the device
2. Local Interface: Interface on the local device ( In our case as we ran this command on Switch_B, the local interface of Switch_B that connects to the corresponding device)
3. Hold Time: How many seconds to keep the entry in table
4. Capability: The codes are mentioned in the output itself. E.g. R: Router S: Switch
5. Platform: This is the platform of the neighbor device to which this switch is connected.
6. Port ID: The neighbor port id that connects to this switch ( Switch_B)
The information in CDP table is refreshed every time it received an announcement. On receiving the announcement the hold time is reinitialized. Basically the lifetime of an entry in the table is specified by the hold time. If in the time of 180 seconds (default) if no announcement is received, that the entry is removed from the CDP table.
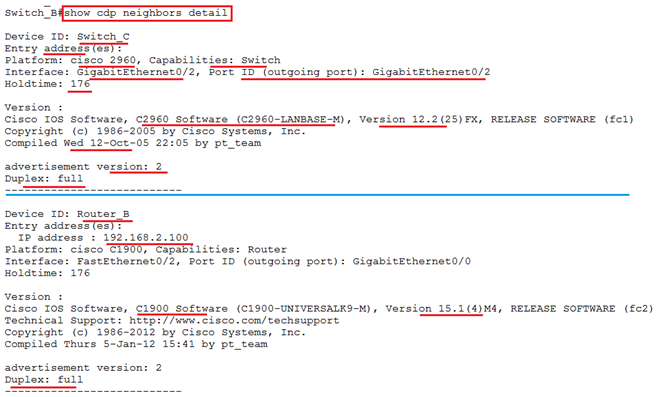
The command “show cdp neighbor detail” gives detailed information about each neighbor.
In the above screenshot, we see that the output of the command “show cdp neighbors detail” gives us very useful information.
For ease of readability, in the screenshot only information from one Switch and one Router is displayed, but you would actually see information for all the connected devices.
Along with the information that we see in the CDP table, like the Device ID, Platform etc, we also see the version number, duplex setting, IP address of the neighbor etc.
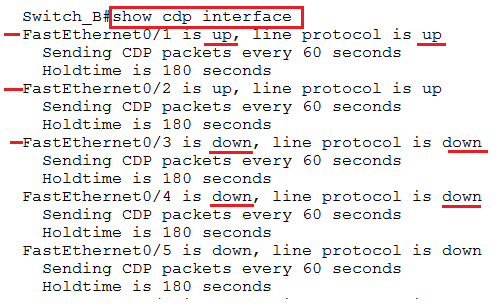
The command “show cdp interface” shows the interfaces that have cdp enabled.
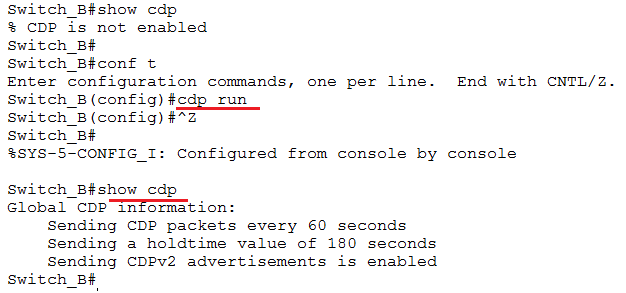
To disable CDP on the complete device, you need to run the command “no cdp run” under global configuration. This makes effect for all interfaces and cdp is disabled.
As shown in above screenshot, after disabling CDP, if we check the output using “show cdp” it gives the output that CDP is not enabled.
You can enable CDP again by running the command “cdp run”
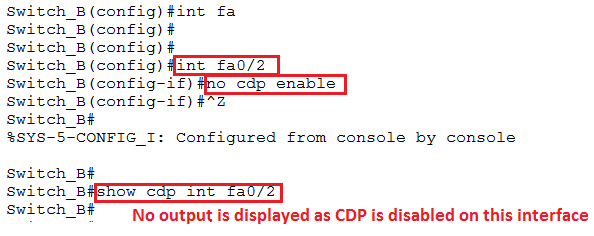
CDP can be disabled on interface basis as well. From out topology, we see the below configuration.
We will now disable int fa/2 on Switch_B, this will have Router_B, removed from the CDP table after 180 seconds.
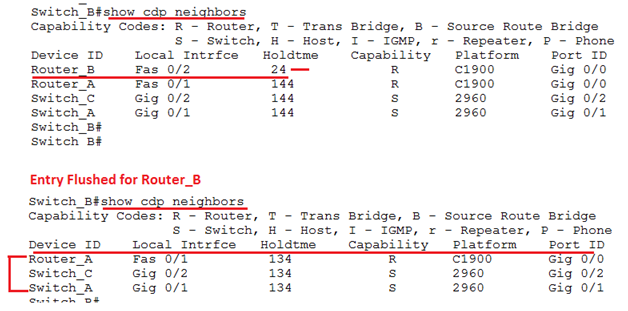
From the below output you see that the Hold time for other devices got reset but the hold time for fa0/2 Router_B, is decreasing. Once it reaches 0, the entry will be flushed from the CDP table.
We see the timer has reduced to 24 seconds and will soon be flushed.
In the above screenshot you see the entry for Router_B removed / flushed from the cdp table after the hold timer reached 0. This is because we have disabled the interface fa0/2 on the Switch_B.
You can also clear the complete CDP table using the command “clear cdp table”
Running this command results in clearing the complete table and then checking or verifying the “show cdp neighbors” shows us no data corresponding to any devices.
So, this is all in CDP. The protocol that is very useful to understand the network topology and verify the network diagrams and documentation.
Free Practice Tests
- Free MTA Practice Tests and Exams
- Free MCSA Windows 7 Practice Tests and Exams
- Free MCSA Windows 8 Practice Tests and Exams
- Free MCSE and MCSA Windows Server 2012 Practice Tests and Exams
- Free CompTIA A+ Certification Practice Tests and Exams
- A+ Practice Test
- Free CompTIA CDIA+ Certification Practice Tests and Exams
- Free CompTIA Linux+ Certification Practice Tests and Exams
- Free CompTIA Network+ Certification Practice Tests and Exams
- Free CompTIA Project+ Certification Practice Tests and Exams
- Free CompTIA Security+ Certification Practice Tests and Exams
- Free CompTIA Server+ Certification Practice Tests and Exams
- Free CompTIA Storage+ Certification Practice Tests and Exams
- Free CCENT 100-101 ICND1, CCNA 200-101 ICND2, 200-120 CCNA Practice Exams and Tests
- Free Cisco CCNA certification practice tests and Exams Questions
- Free CCNA Security Certification Practice Tests and Exams
- Free CCNA Wireless Certification Practice Tests and Exams
- Free CCNA Voice Certification Practice Tests and Exams
- Free CCNP practice tests and Exams Questions
- Free CCIE Collaboration Certification Practice Tests and Exams
- Free CCIE Routing and Switching Certification Practice Tests and Exams
- Free CCIE Security Certification Practice Tests and Exams
- Free CCIE Wireless 350-050 Practice Exam

