Scanning Networks
Scanning Networks
Scanning is an important phase and a hacker needs to have knowledge of operating systems, ports, protocols and networks.
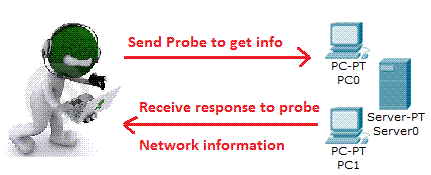
In this phase the target system is scanned to look for open ports and vulnerabilities. One can find reach ability of devices using the ping command and then run port scans on the active IPs. This phase is still a part of the information gathering but is more interesting than the footprinting phase and this begins to give you the feel of hacking.
It is in this phase that we get to know:
- Live systems on the network by pinging
- Find out services that are run on target
- Find the TCP and UDP ports and services
- Find the Operating System running on the target
Types of Scanning
- Port Scanning : To find open ports and services on target
- Network Scanning: Find IP address in the network of the target
- Vulnerability Scanning: Find weakness or vulnerabilities on the target
Port Scanning: In this process the hacker identifies available and open ports and understands what services are running. You must understand the ports and port numbers. The ports numbers can be in these three ranges:
- Well known Ports from 0 to 1023
- Registered ports from 1024 to 49151
- Dynamic Ports from 49152 to 65535
In you are using a Windows system, you can see the common or well-known ports in the below path: C:\Windows\System32\Drivers\etc\services
Some common port numbers are as below:
| Port Number | Service |
|
20 and 21 |
FTP |
|
23 |
Telnet |
|
25 |
SMTP |
|
80 |
HTTP |
|
443 |
HTTPS |
|
110 |
POP3 |
|
500 |
IP Sec : ISAKMP |
|
53 |
DNS |
Network Scanning: This means to look for active machines or targets on the network. This can be done using tools or scripts that ping to all IP addresses on the networks and get a list of the alive nodes and their IP addresses.
Vulnerability Scanning: This is the mechanism where the target is scanned or looked for any vulnerability. In this scan the Operating system is found out with installed patches etc and then based on the information vulnerabilities are found in that particular version of Operating System.
If you use scanning on a target network, if the target network has Intrusion Detection System (IDS) installed, then the hacker or scanner can be traced back easily. The IDS then send alert on the system that someone is trying to seek information from the system. Being a CEH if you perform any scans it should not be detected, as we would not want target systems to know someone is trying to attack their system.
Scanning Methodology
This is the sequence or steps how the scanning needs to be carried out and what information needs to be collected and documented so it can be used for further phases of hacking.
Steps or phases for scanning
Look for Live Systems -> Check for Open Ports -> Identify running services -> Check running Operating System ( OS Footprinting) -> Scan Vulnerabilities -> Document details and draw Network diagram -> Prepare Proxies to avoid being caught -> Proceed with Attack
Looking for Live systems, this is done either using the normal PING command or using third party tools or scripts to run multiple pings to destination or target.
As we know PING uses the protocol ICMP, thus an ICMP echo request is sent to the destination or target IP address, if the target is active or alive it would respond with an ICMP Reply. This also informs if ICMP can be passed through a firewall. Mostly organizations have started blocking ICMP requests to be safe from attacks.
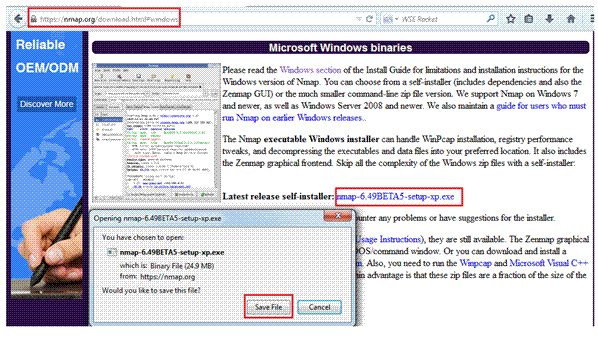
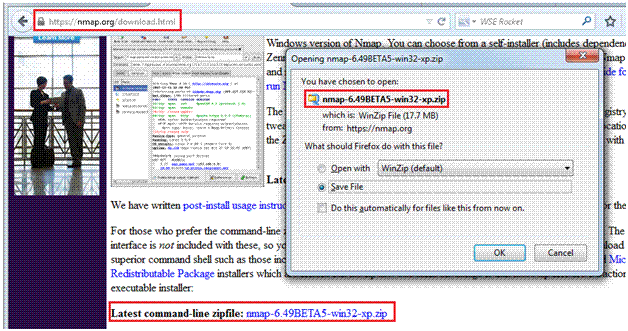
NMAP is a very popular tool used for scanning. It can be downloaded from the below link.
https://nmap.org/download.html
It is available for Windows GUI (Zenmap) and CLI (nmap).
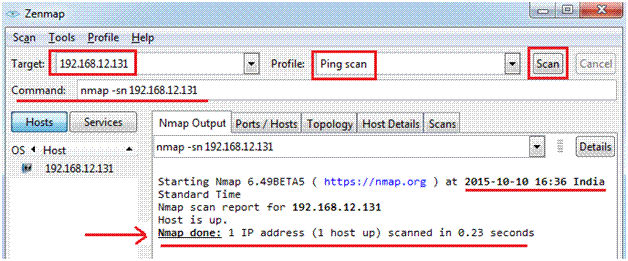
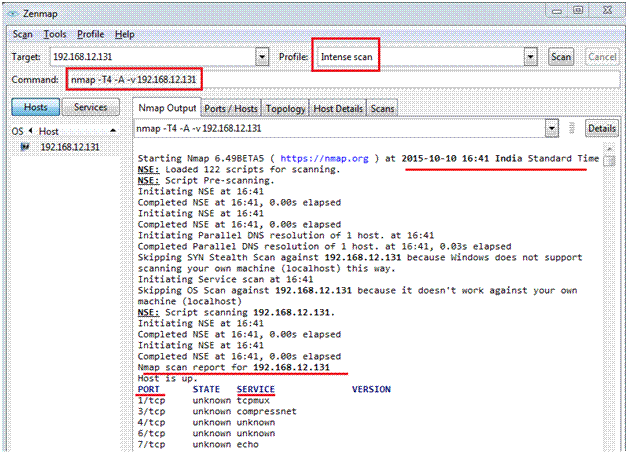
The installation is simple and once installed you can see the screen like below. You need to specify the target IP or range, the type of scan you want to perform under “Profile”.
If you note, Zenmap also give you a command line equivalent when you fill in the details, you can directly copy the syntax or command from here and run it on CLI.
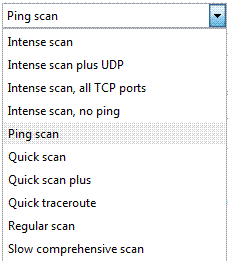
The types of scans in nmap are as below; you can see it in the drop down list.
The syntax and example of types of scans are mentioned as below:
Intense scan, all TCP Ports
nmap -p 1-65535 -T4 -A -v 192.168.12.131
Intense Scan
nmap -T4 -A -v 192.168.12.131
In the above screenshot we see that scan is complete and it shows the port numbers and service.
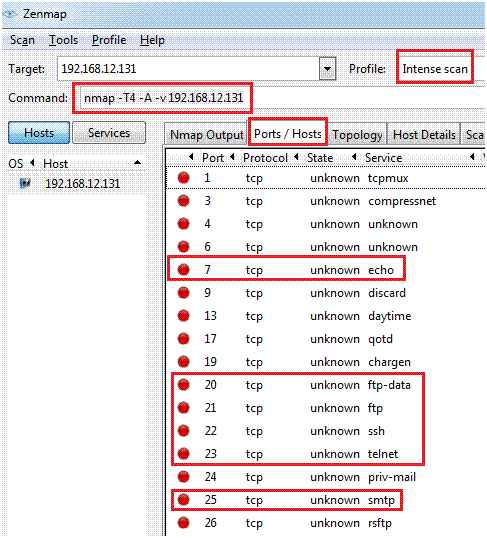
When you check the Ports /Host tab, you see the ports and the corresponding service name.
To Find the Operating System of a host, you need to use the ‘O’ switch as below
nmap -O 192.168.12.131
To Scan multiple IP address or subnet (IPv4)
nmap 192.168.1.1/24
To scan a range of IP address:
nmap 192.168.1.1-20
For scanning you can mention the IP addresses in a file and have NMAP read these IP from the file. The -iL option is used.
Create a file as below:
cat > /temp/test_ips.txt
Sample outputs:
server1.domain1.com
192.168.1.0/24
192.168.1.1/24
Now to run the command the syntax is:
nmap -iL /temp/test_ips.txt
To Exclude some hosts/networks
You can exclude hosts from a scan if you do not want to access the full network.
nmap 192.168.2.0/24 –exclude 192.168.2.10
nmap 192.168.2.0/24 –exclude 192.168.2.10,192.168.2.234
To find if a machine or network is behind a firewall and protected
nmap -sA 192.168.2.25
nmap -sA server1.domain1.com
To scan a device even if it is protected by the firewall
nmap -PN 192.168.2.25
nmap -PN server1.domain1.com
If you want to scan IPv6 addresses, use the -6 option.
nmap -6 server1.domain1.com
nmap -6 2302:f0e0:1001:41::3
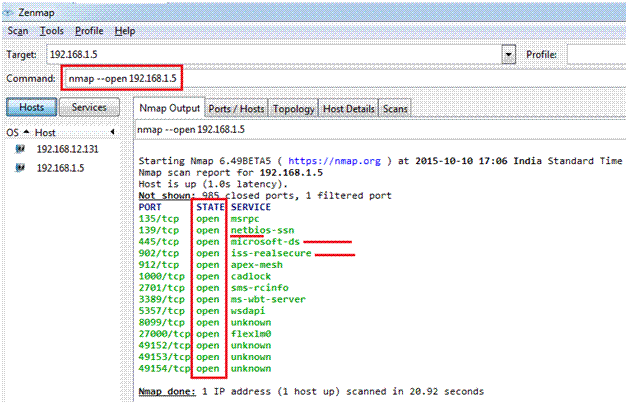
If need to look only at open ports
nmap –open 192.168.1.5
nmap –open server1.domain1.com
The screenshot above shows the open ports and also shows the response coming from Windows System, as IIS is active, NetBIOS is being used.
To see the target interfaces and routes
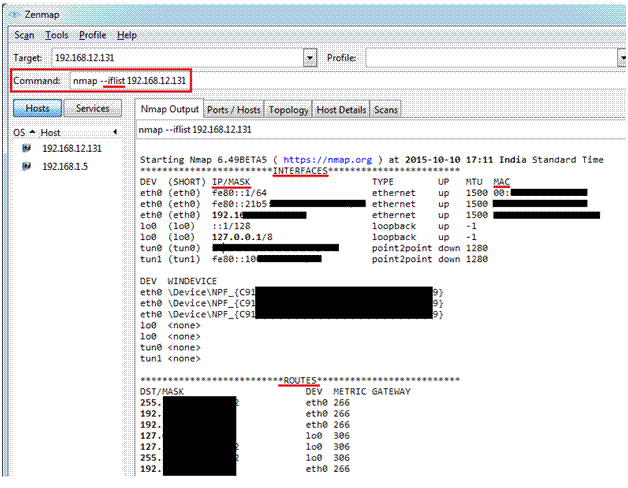
nmap –iflist < IP Address of target>
nmap –iflist 192.168.12.131
The above screenshot has some MAC address hidden, but in an actual scan you can see all the information. Also you see routes used on the device.
To scan for specific ports
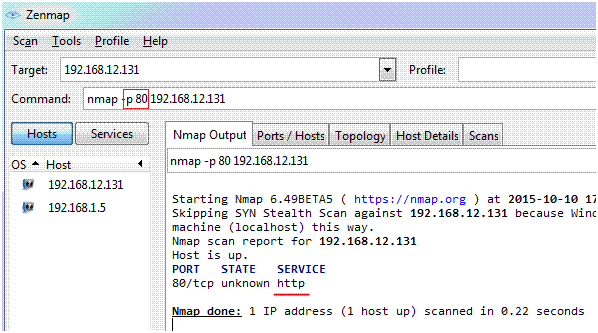
map -p [port] Target name or IP address
nmap -p 80 192.168.12.131
The above screenshot shows that the HTTP service is being used. We used the port 80 to do a scan.
Tools for ping sweep are:
Angry IP scanner – http://angryip.org/download/#windows
SolarWinds Engineer Ping Sweep -> http://www.solarwinds.com/engineers-toolset/ping-sweep.aspx
TCP 3 Way handshake
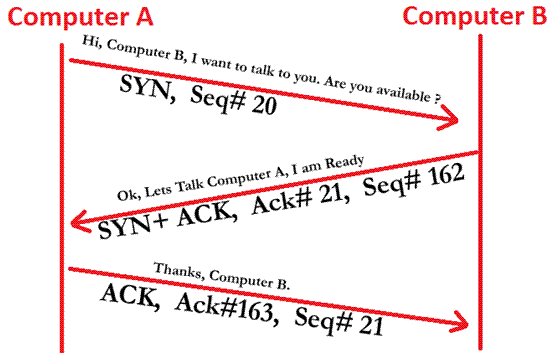
As TCP is a connection oriented protocol, it does need to establish a connection before data transfer. It uses process in which SYN, SYN+ACK and an ACK packet are used and is known as 3 way handshake.
The process goes like this:
First the Computer A, send a SYN packet, initiating the connection and then Computer B, sends a SYN+ACK, confirming it is ok for communication. Finally, Computer A, acknowledges the connection and thus connection is established.
Different Type of Scanning:
a) TCP Connect / Full Open: This scan technique is used to detect open ports by completing the 3 way handshake. The connection is teared down using the RST flag.
b) Stealth Scan: Half Open, XMAS Scan, FIN Scan, NULL Scan: This technique is used by hackers to hide themselves from firewalls by bypassing them and any other logging system.
c) IDLE Scan: Web servers are usually listening on port 80, it waits for a client to form connection. If a SYN is sent to a target machine and if the sender receives SYN + ACK, it means the port is open. If a RST is received then the port is closed on target.
d) SYN /FIN Scanning: In this scanning only either a SYN or FIN is sent in the TCP Frame. It works with older version of Windows and not with the current ones. If FIN is sent and no response it means the port is open. But if it gets a RST /ACK, it means the port is closed.
e) ICMP Scan: This is the scanning technique where PING is used to get information from the target system. It tells if the target machine is ALIVE.
f) NULL Scan: In this technique, none of the flags are set. TCP Frame is sent with NO Flags. This also does not work with newer versions of Windows OS. This avoid the IDS and 3 way handshake but only woks on UNIX.
Some popular Third Party tools are: Mega Ping, Free Port Scanner, IP Tools, and PRTG Network Monitor etc.
NOTE:
There are some IP which you should NOT Scan, please note these and you may also get a list of such IPs on the Internet. PLEASE DO NOT SCAN ANY SUCH IPs or any PUBLIC IP without permission or do it at your own risk. Because it may be part of Cyber Crime if you are caught trying to scan someone’s Network, even though you may be doing it for learning purpose. SCRIPT NO TO SCAN IP ADDRESSES without PERMISSION, Else you are in TROUBLE.
RANGE 128
128.37.0.0 -> Army Yuma Proving Ground
128.38.0.0 -> Naval Surface Warfare Center
RANGE 129
129.29.0.0 -> United states Military Academy
129.50.0.0 -> NASA Marshal Space Center
And Many Such Ranges Like: 130, 131, 132, 6, 7 and many more, always be careful while playing with NMAP for scanning, one silly mistake and you may be in trouble.
Some ways to be protected from Scanning
a) Use of Firewalls and IDS
b) Do not keep unnecessary ports Open
c) Do not keep sensitive data on public servers
d) Keep latest release packets updated on all devices
Banner Grabbing / OS Finger Printing
Is the technique to find the Operating System of the target. It is very important to know the target Operating System as based on the OS, the hacker can look for vulnerabilities in the OS and accordingly plan the attack.
Active Banner Grabbing: intentionally packets are sent to target to retrieve information of OS, like its name, Version etc.
Passive Banner Grabbing: Based on some errors we can understand what type of Operating System is running on the matching. If you get some error related to IIS (Internet Information Server), you understand it is the web server running on Windows OS.
There are some third party tools used for banner grabbing, such as: ID Serve, Netcraft, Netcat.
The below can help to protect yourself from attack of banner grabbing.
->Use false banners, will misguide the hacker
->Do not keep unnecessary servers open
->If using IIS, then can prevent banner being used with IIS Lock down Tool or Server Mask
Vulnerability Scanning
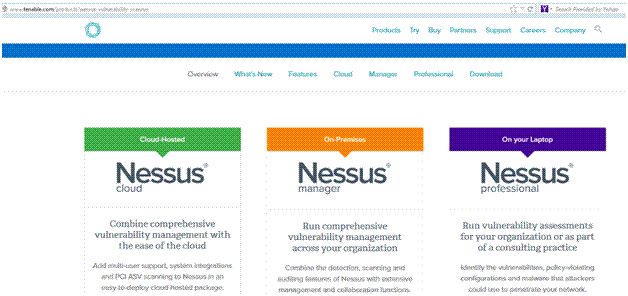
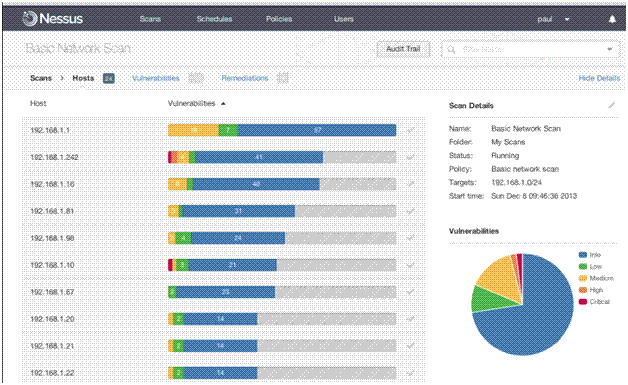
This is done using a very popular tool called Nessus. It is the most popular tool and gives all information about the vulnerability on the target.
http://www.tenable.com/products/nessus-vulnerability-scanner
This tool helps in:
– Data collection
– Identify hosts
– Scan Ports
– Report the information found
Some screenshots below show how Nessus is helpful.
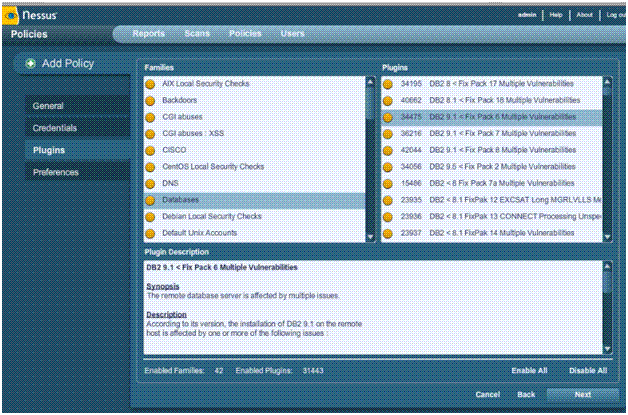
In the below screenshot we see that Nessus shows vulnerabilities in some Databases, it gives a brief description about it.
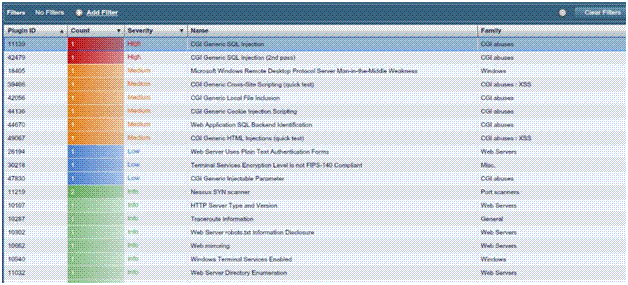
This below screenshot shows the risk level or severity of the vulnerabilities.
This screenshot below will show the hosts and the level of risk on each host
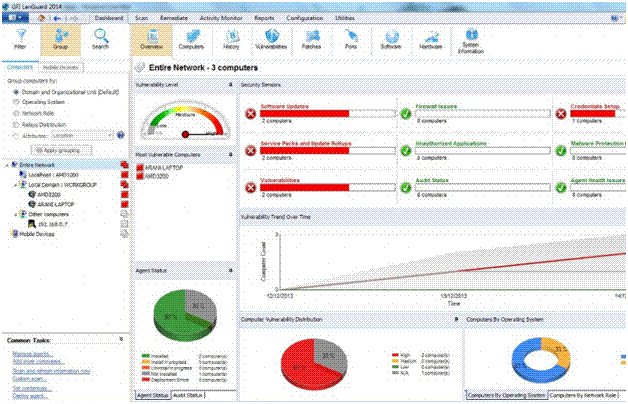
GFI LAN guard is another important tool that helps in handling the network inventory and also looking for vulnerabilities on the nodes or servers.
Some other popular tools for Network Vulnerability scanning are: Retina CS, Qualys Guard, Nexpose, Open VAS etc.
Draw Network Diagram
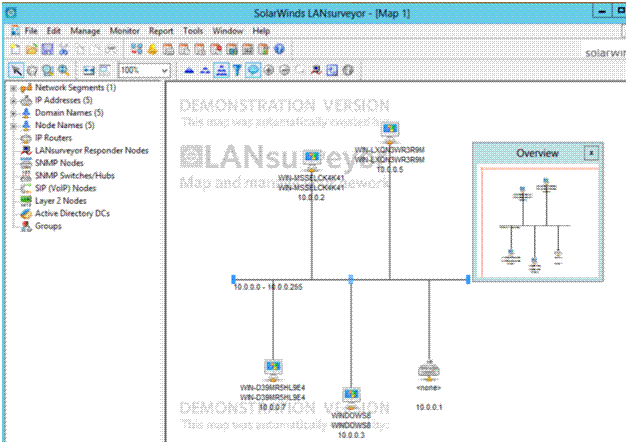
Tools like Solar Winds LAN Surveyor can be helpful to make a network diagram of the network. These diagrams can them be moved to Visio for documenting it.
Other tools used for this is LAN State, NetMapper, OpManager, Network View, Dude, etc.
Proxy Servers
A Proxy server means some other computer is used as an alternative to connect with other computers. Organizations configure Proxy servers so the main servers are not directly accessible to outside world. Thus the IPs etc are not released in public and the servers can be safe. The basic working is as such: If a hacker wants to access some page, the request goes to proxy server and then from the Proxy server to the Main server. Thus the main server is isolated from the outside network.
The use of proxy can also be done by Hacker, to avoid them from being caught. Hackers try and attack a target computer from some other computer using Proxies, so the actual IP address is not traced back or is very difficult to trace back.
There are several free proxies available on the Internet if you use those your IP address is not revealed, the IP of the proxy server is sued. An attacker can also make use of multiple Proxies and do a final attack, since the attacker uses a chain of proxies it is known as Proxy chaining.
Some tools used are: Proxy Work bench, Proxifier, Proxy Switcher, TOR (The Onion routing) is a very popular one.. Gproxy, Fillder etc.
All the information gathered using the scanning techniques mentioned above, need to be documented which can be used for the future.
Hope this is helpful!!!
Read more
- What is Ethical Hacking
- Footprinting and Reconnaissance
- Trojans and Backdoors
- Enumeration Hacking Phase
- Sniffers
- Social Engineering
Read more

