Default Route and Static Routes Configuration
Static and Default Routes
Like in regular life, to reach to a destination, we need to know the route to it, else we get lost, so is in the world of Networks. For the data or packet to traverse to another location, it must know the route; else it gets lost / dropped.
For Network devices to communicate they should be able to reach each other and to do this you can use the following.
- Directly Connected
- Static Routing
- Dynamic Routing
Choosing which method from the above depends on the number of devices in the network. For a small network you could handle the routing through some static routes and default route.
Directly Connected: Directly connected devices are physically connected devices with each other. These devices can see each other in their routing tables and communicate. We must have the IP addresses configured on the interfaces, in the routing table you will see the IP address of the directed connected interface.
A directly connected route is shown with ‘C’ mark in the routing table (show ip route)
Static Routing: This is the Routing where the route to a network is entered manually by your network administrator. The administrator sees the network design and accordingly decides to add routes for communication. Using the help of the static route, the administrator tells the device what path it should take to reach some other device. This is a tedious process if you network begins to grow over 10 devices as the network administrator will have to enter these routes for all the devices to communicate with each other.
So we have a more easy method, Dynamic Routing.
Dynamic Routing: This is a method in which we use the Dynamic routing protocols and it is these protocols that perform some computations and decide a best path to reach a destination. Here the network administrator role is to configure the Dynamic routing protocol. Choosing the best path and changing path if any failures etc is taken care by the routing protocol dynamically. This eases of the load of a network administrator.
We have different dynamic routing protocols like:
RIP: Routing Information Protocol
IGRP: Interior Gateway Routing Protocol
EIGRP: Enhanced IGRP
OSPF: Open Shortest Path First
In this article we will focus on Static routing and Default Route
As discussed in earlier, a STATIC Routing makes use of Static routes. The network administrator will configure the router interfaces with manual entries of the route. It is a difficult task if the network is increasing with more devices being added. Ideally networks under 10 routers can be configured with only static routing.
The administrative distance of a static route is 0 or 1.
The Benefits of using Static Route:
– As the route is entered by the administrator, the CPU load is less, as no computations need to be performed.
– The bandwidth consumption will be less. Dynamic routing protocols send a lot of their own data like metrics, authentication etc. over to other routers which consume the bandwidth.
– Adds to security because the routes are added by the administrator and nothing is done automatically / dynamically. The admin enters specific routes where they intend to reach.
The Drawbacks of Static Route
– If you have a fairly large network, the administrator has a tedious job of configuring the routes manually with are time consuming and also prone to human error.
– Can be confusing when looking to troubleshoot connectivity issues.
– If any changes in the network, the same need to be modified across all the routers.
Configure Static Route
Configuring a static route is very simple and easy. It’s just one statement.
The simplified syntax would look like:
Router(config)# ip route <destination network> <destination subnet mask> < next hop ip address>
OR
Router(config)# ip route <destination network> < destination subnet mask> <Self router exit interface>
Consider the below scenario and see the respective configuration.
Router A’s routing table show the networks directly connected.
Router B’s routing table show the networks directly connected.
Below are the IP addresses assigned to the hosts or PCs.
PC 0:
PC 1:
————————————————————————————————————————–
PC 2:
PC 4:
When we ping from PC0 to PC1, we get successful ping replies, because both are in same network.
When we ping from PC0 to PC2, we get a failure, (Destination host Unreachable). Notice the IP address, reply coming from the router i.e. 10.0.0.100 which means the packet is reaching the router but the router does not know whom to send ( the 20.0.0.0 network is not in the routing table), and thus drops it.
If you cross check by ping PC 2 from PC 3, we get successful ping ( Same Network) , but PC 3 cannot ping to the PC0 or PC1 ( Different Network)
We understand that there is no communication between 10.0.0.0 and 20.0.0.0 network. Thus for device to communicate successfully, they should know about each other. We will use Static routing to make them aware.
Let us configure our routers, we begin with Router_A, Here, ip route is the command we use for static routes.
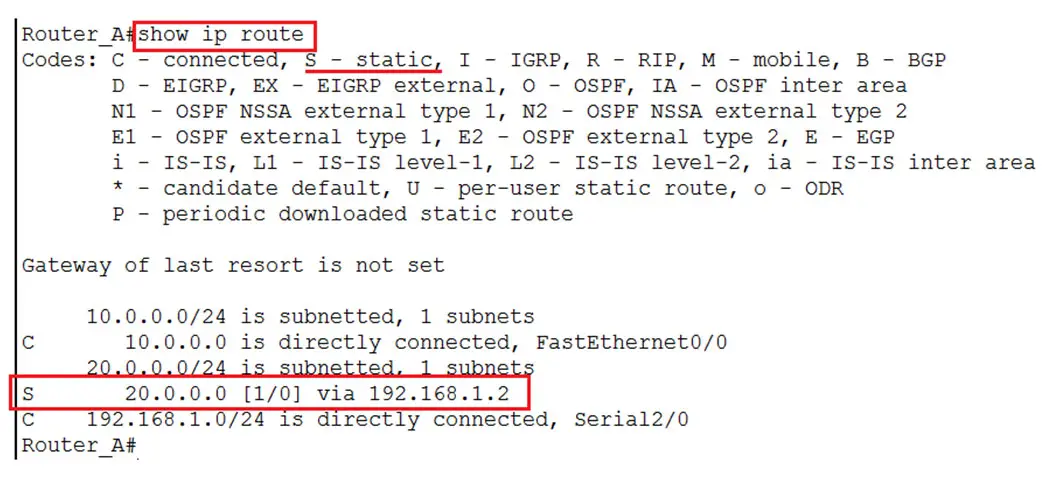
Now check the routing table and we should see some static route entry in it. The entry marked near a ‘S’ is the static route.
Command to check the routing table is “show ip route”
Now test by pining from PC0 to PC2 or PC3, we should get successful ping now and vice
On Router B, configure the static route.
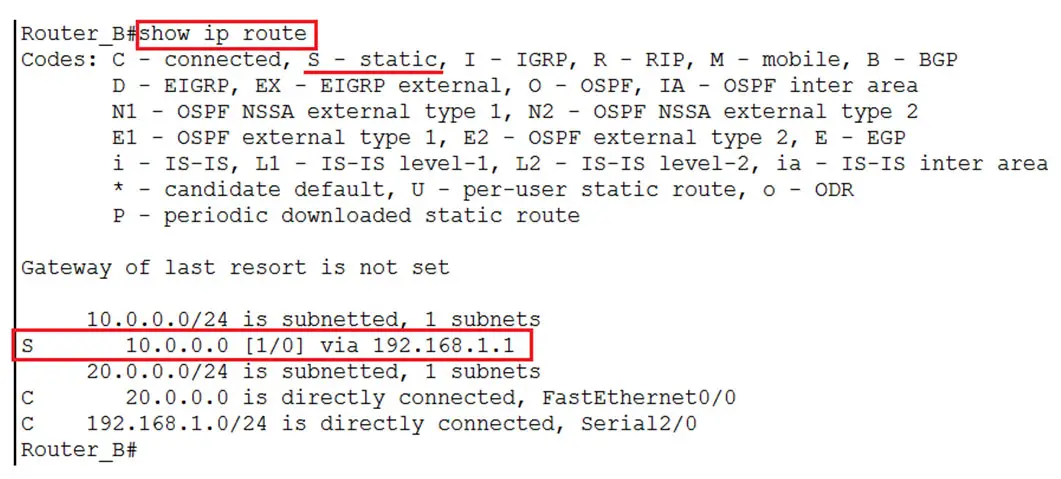
The route is then displayed in the routing table
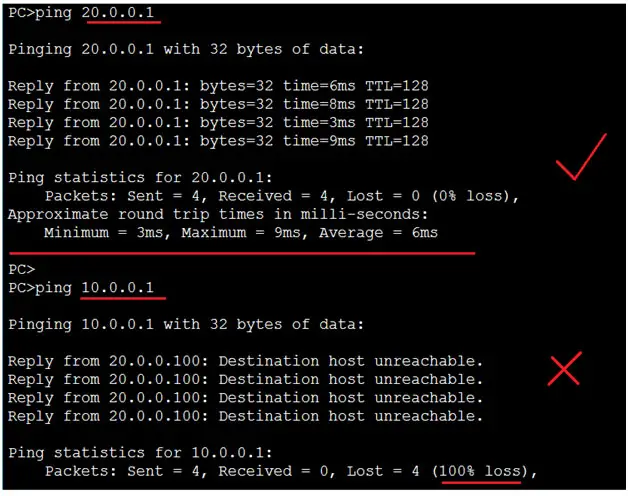
Also see from below screenshot, that we were earlier unable to ping to the 10.0.0.0 network, from Router B, but now we have successful pings, it’s because now the routing table has an entry for 10.x.x.x network and thus forwards packet to that destination.
We can also verify the flow by using a trace route. Relate the trace route with the diagram for better understanding.
When there is no route available in a routing table to reach a particular destination, the packet is dropped.
In scenarios where we access certain websites, like Google, Yahoo, Facebook etc, our router must have routes to these website’s network address. However, it is not possible to add routes for the entire Internet as there are thousands of websites available.
In order to achieve connectivity to the outside world i.e the Internet one must have a default route configured.
Thus, we use default routes to directly transfer packets which are destined to reach some destination whose entry is not available in the Routing Table.
Default routes also help simplifying your configuration as you need not make static route entries for all the networks.
We can use default routes where there is only one exit point in a network. Let’s take a simple example to understand the concept. Say we have these 6 routers A to F
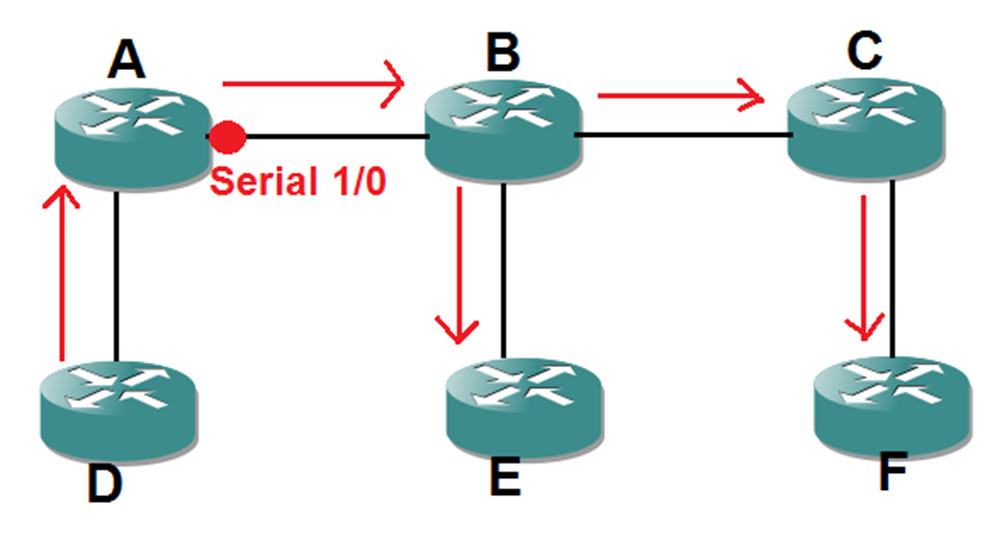 Consider if Router D wants to communicate to any of the routers shown in the picture, it has to pass through Router A’s interface Serial 1/0
From D towards other routers, it has to go out through router A
D→ B via A
D→ E via A
D→ C via A
D→ F via A
If you notice, to reach any network Router D has to make use of Router A, thus instead of writing several static routes like :
# ip route <B’s network address> <B’s Subnet Mask> < Next Hop i.e. A>
# ip route <E’s network address> <E’s Subnet Mask> < Next Hop i.e. A>
# ip route <C’s network address> <C’s Subnet Mask> < Next Hop i.e. A>
# ip route <F’s network address> <F’s Subnet Mask> < Next Hop i.e. A>
We can just add one statement and we are good to go.
# ip route 0.0.0.0 0.0.0.0 <Next Hop i.e. A>
This means that any network ID, any Subnet mask goes through Router A, which is the Next Hop
Let’s see the configuration, consider the below scenario. We have Router A, Router B and Router C and Networks as below:
10.0.0.0 /24
20.0.0.0 /24
30.0.0.0 /24
If a PC in Network 10.0.0.0 /24 e.g. wants to contact 10.0.0.1, to reach any other Network it has to traverse through Router B’s Serial 2/0.
So we need to configure the default route on Router A, giving the next hop as Router B Serial 2/0 IP.
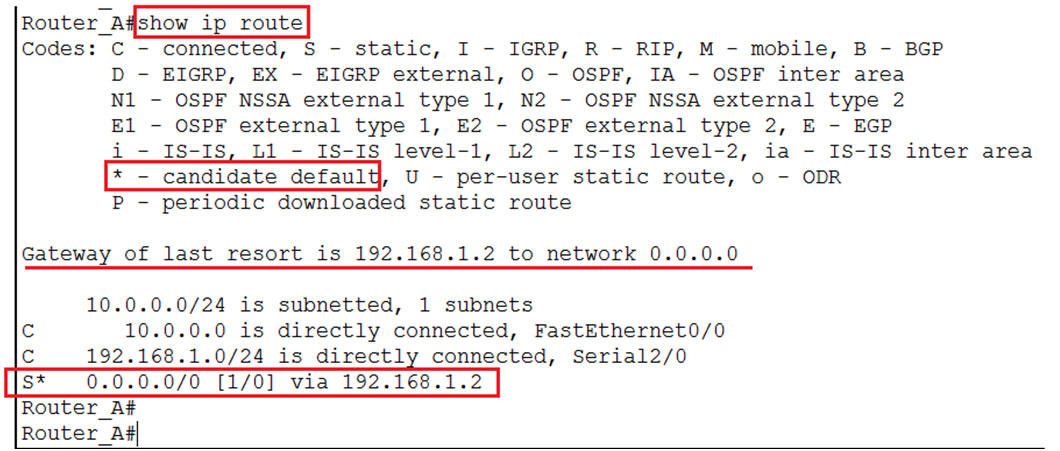
The Routing Table of Router A Looks as below:
Notice the * Asterisk in S*, it means this is a Default Route. Also note it is the least preferred route i.e. if no other in the routing table matches the destination then only the default route is considered.
Similarly, for a PC in Network 30.0.0.0 /24, e.g. 30.0.0.1 to reach the other Network has to traverse through Router B’s Serial 3/0.
So we need to configure the default route on Router A, giving the next hop as Router B Serial 3/0 IP.
After configuring the default route you can verify the Routing table for Router C. We see the S* which means Default Route.
 As Router B is the middle router and both Router A and Router C communicate through it, we should have static routes towards Network A: 10.0.0.0 /24 and Network C: 30.0.0.0 /24
The Routing Table of Router B looks like:
Read more
- Routing and Routing Protocols
- RIP
- IGRP
- EIGRP
- HSRP
- VRRP
- OSPF
- BGP
- Routing, Static Routing, Dynamic Routing


