Configuring Fast Ethernet and Serial Interfaces on Cisco Router
Configuring Fast Ethernet and Serial Interfaces on Cisco Router
Consider the following figure:
Configuring the Fast Ethernet/Ethernet Port of the Router
Open the Norman_Router Terminal (Command Line Interface prompt).
Norman_Router> enable
Norman_Router#
Now verifying the interfaces on the router.
Norman_Router# show ip interface brief
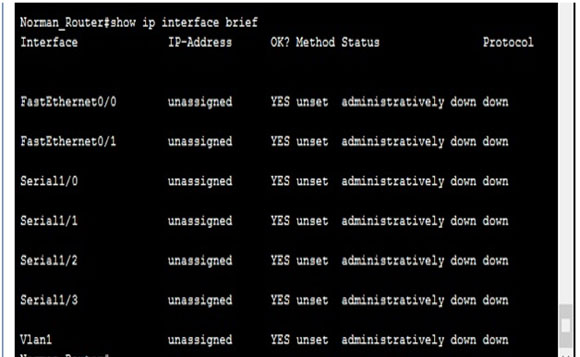
The result will be displayed as following figure:
As shown in the above figure, there are two Fast Ethernet Interfaces, i.e., Fa0/0 &and Fa0/1 and four Serial Interfaces,
i.e., S1/0 ,, S1/1, S1/2 ,,S1/3
To configure the Fast Ethernet port, we have to configure those interfaces which are physically connected to other network devices or routers.
Norman_Router# configure terminal
Norman_Router(Config)# interface fastEthernet 0/0
Norman_Router(Config-if)#
Now we are in fast Ethernet Interface mode (as shown (config-if), configuring the IP address on these interface e.g, 192.168.1.1 and subnet mask 255.255.255.0.
Norman_ router(Config-if)# ip address 192.168.1.1 255.255.255.0
Norman_Router(Config-if)# no shutdown
Which means we are making these port Administratively UP
Norman_Router(Config-if)# exit
Norman_Router(Config)#
Now verifying the Interface
Norman_Router(Config)# exit
Norman_Router# show ip interface brief
You will see the following results:
As you can see in the above image, Fast Ethernet 0/0 is configured to IP address 192.168.1.1 and its status is UP, which means it is Administratively UP. If we had not written the Command “no shutdown”, then the status would be “administratively down”.
Configuring the IP address of the PC connected to the router Fast Ethernet Port 0/0 as shown below:
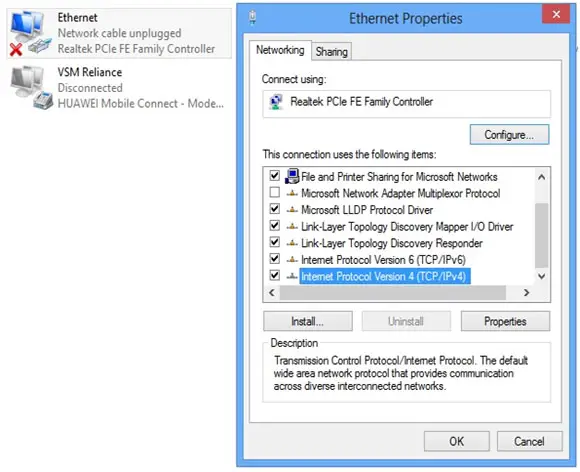
Click on the Internet Protocol Version 4 (TCP/IPv4).Then Configure the IP address as shown below.
We have configured the IP Address: 192.168.1.2. We can take any number between 2-255, which means 192.168.1.2 to 192.168.1.255, because it is a CLASS C IP address.
The Default Gateway : 192.168.1.1. We have to configure the router’s Fast Ethernet IP address, because from that IP address our PC will access the other networks. DNS Sever Address is kept default, i.e., 4.2.2.2, which is the DNS server address of Google.
- After Configuring At Both The Router And The PC, Verify the Connection By Pinging From The PC to The Router’s IP address, i.e., Default Gateway :192.168.1.1 .
Open Command Prompt in the PC which is connected to the router.
Type PC> ping 192.168.1.1
It will show the following results:
Now our connection will look like the screen below:
The green signal indicates the connection was successful.
- Configuring the Serial Interface of Router
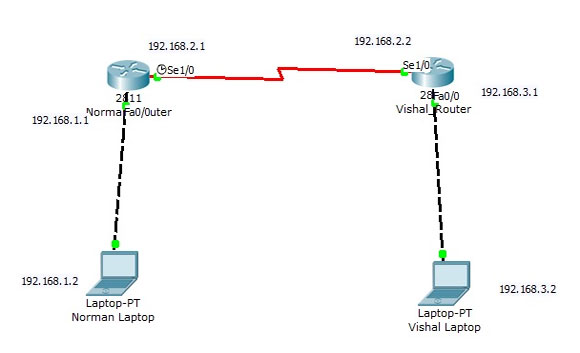
Consider the figure below:
As shown in the above image, configure the Vishal_router and Vishal Laptop with the IP Address shown in the image by following the above process of configuring the FastEthernet. The green light on the FastEthernet port indicates that Fast Ethernet on both the routers is connected Successfully. But the Serial Interfaces are not configured.They are only connected physically.
Configuring the Serial Interface on Norman_Router
Norman_Router# show ip interface brief
The below image will show the Interface list and IP address of Norman_Router.
Now Serial Interface Serial1/0 of Norman_Router is physically connected with Vishal_Router Serial Interface Serial1/0, so configurr that interface on Norman_Router.
Norman_Router# configure terminal
Norman_Router(Config)# interface s1/0
Norman_Router(Config-if)# ip address 192.168.2.1 255.255.255.0
Norman_Router(Config-if)# clock rate 64000
Norman_Router(Config-if)# no shutdown
Verifying Configuration of Norman_Router
Norman_Router(Config-if)#exit
Norman_Router(Config)#exit
Norman_Router# show ip interface brief
As shown in the above image, the serial interface S1/0 is configured to IP address 192.168.2.1, but it’s not UP yet, because the serial connection requires the other end to be UP. So now to configure the same on Vishal_Router
Vishal_Router(Config)# interface s1/0
Vishal_Router(Config-if)# ip address 192.168.2.2 255.255.255.0
Vishal_Router(Config-if)#clock rate 64000 (for serial connection Serial DCE )
Vishal_Router(config-if)# no shutdown
Now Verifying The Configuration of Vishal_Router
Vishal_Router(Config-if)#exit
Vishal_Router(Config)#exit
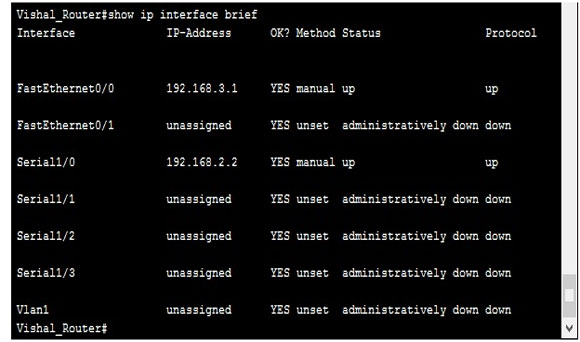
Vishal_Router# show ip interface brief
As shown in the above image, the Vishal_Router Serial interface configured and it’s UP. Now it will also UP on the Norman_Router.
Verify whether the Serial Interface is UP or not by pinging from Vishal_Router to Norman_Router, or vice versa.
Vishal_Router# ping 192.168.2.1 (which is Norman Serial Interface IP address)
Hence the connection and configurations are successful.
The Connection will be as shown in the below image.
The green light Indicates that the connection was successful on the Serial and Fast Ethernet Interface.
Read more
- What is IOS
- Router Memory
- Router Startup
- Understanding of Router Prompts
- Help Features of Router
- How to Configure Hostname, Clock and set banner on Cisco Router
- How to save router configurations
- How to set passwords on Cisco router
- How to Backup Cisco Router IOS
- Cisco Router Password Recovery
- Router IOS Commands and Basic Router Configuration
- Access Lists


