How to Setup a Home Network
How to Setup Home Network
As we know in today’s world we not only use devices in our offices but we also make use of computers and Internet at our homes as well.
Staying connected has become a necessity these days and people often look to setup a small network at their home, so they have their devices connected and communication is smooth.
In this article we will see how we can setup a home network.
The main reason to connect devices in a network is sharing of resources and easy transfer of files from one to another device.
For your computer to connect to other computers on the network there are certain hardware requirements, like:
– Network Card (NIC: Network Interface Card): This is the RJ-45 port either inbuilt on your motherboard, or you may have to connect and external NIC to your motherboard. The RJ-45 socket or female pin looks like in below image.
The male connector which is on the cable looks like below:
In actual the picture of the cable looks like this:
– A Network Hub (All devices connect to this central device). It is a device with multiple sockets where a RJ45 connector can connect.
– Network cables that connect the Hub and the computer. You need to use a straight through cable to connect a computer and a Hub
Now let’s do the connectivity
1. Connect the cable from the computer to the Hub. The below graphic would give some idea on how it is connected. Connect the Power cable on the Hub and Power it on.
2. Configure the devices with IP address in the same network, so the communication can happen between devices.
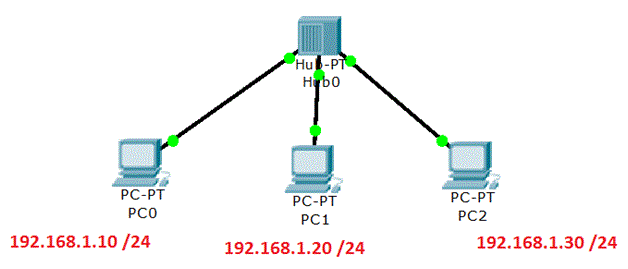
3. See the below test done in Cisco Packet tracer, using a Hub to connect 3 computers and make communication possible between these devices.
4. In the above picture we see the topology, how the devices are connected to the HUB. We also see a picture of the HUB, back panel, which has 6 ports which means 6 devices can be connected but have connected only 3 devices.
5. When you plugin new devices, the devices do not have an IP address, so they cannot communicate with each other. We need to configure the IP address as mentioned in the above diagram.
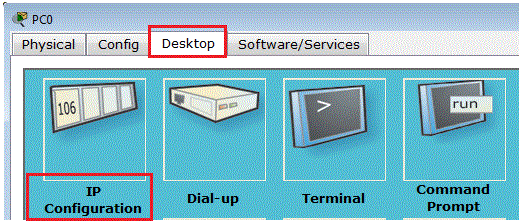
6. To configure the IP address, in Packet Tracer click the computer and then under the Desktop Tab, choose IP Configuration.
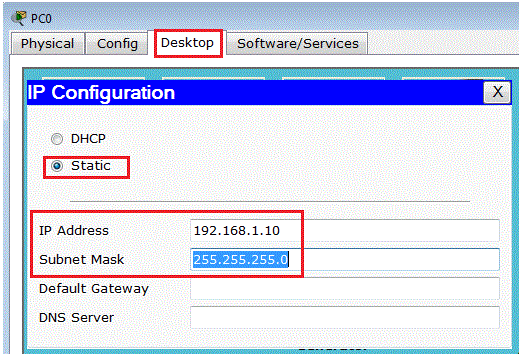
7. In the available option choose Static as we want to assign a Static IP address. Under IP address, give 192.168.1.10 and subnet Mask as 255.255.255.0 ( 192.168.1.10 /24)
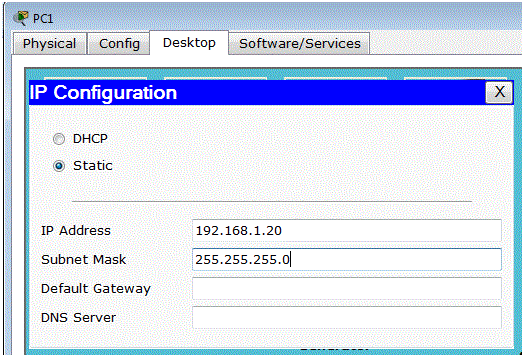
8. Similarly configure the IP addresses for PC1 and PC2 with 192.168.1.20 and 192.168.1.30 respectively.
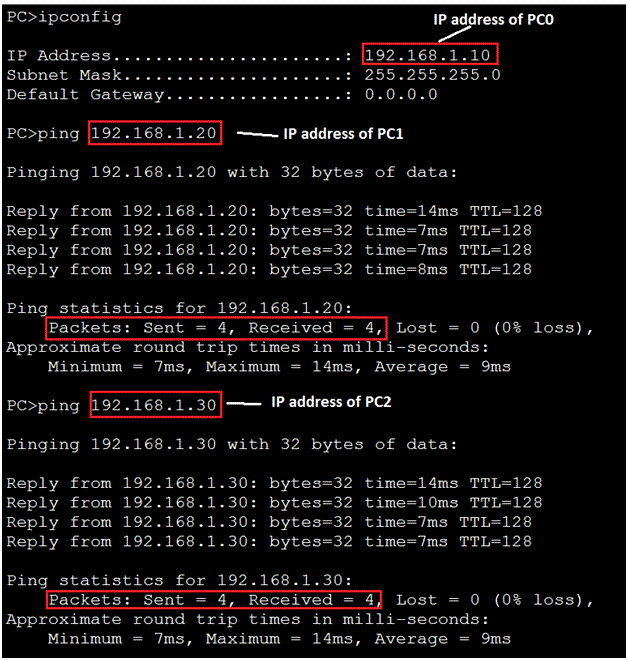
9. Now check if the IP is configured by running the ‘ipconfig’ command in the command prompt and then ping to the other devices. Let’s connect to PC0 and then test the connectivity.
10. In the above test we saw PC0 successfully sending ping messages to PC1 and PC2, which means they are connected and now in the network and communication can take place between them.
11. Similarly you can test the communication from PC1 and PC2.
12. If a device is disconnected or switched off or the cable is unplugged either from the hub or the computer, the ping result will not be successful and communication with not be possible.
13. To test that, let’s turn off PC1 and then try to ping it from PC0.
14. In Packet Tracer to switch off the computer. Click on the computer and under the Physical Tab; you see the physical view of the device, Click on the power button to Switch off or on.
15. We see that by turning off the power, the topology shows RED color for cable communication, which means the communication, is broken.
16. See the below results with ping to confirm that communication is not possible from PC0 to PC1, but PC0 can communicate to PC3.
To configure IP address on actual computers, for example your Windows 7 computer.
1. Click on Start Button -> Control Panel -> Network and Sharing Center
2. Click on “Change Adapter Settings”
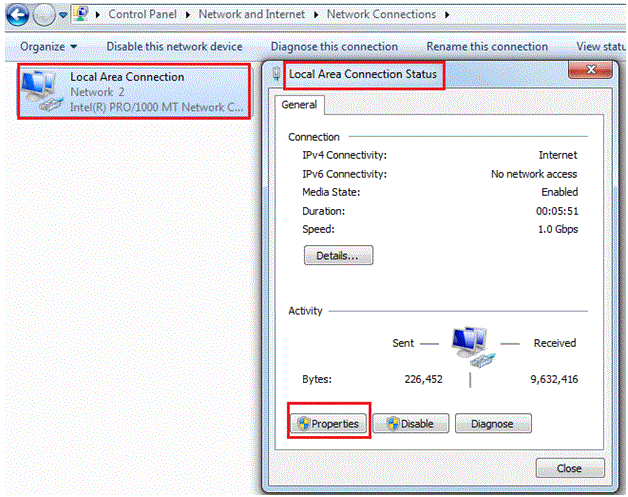
3. You will find a network adapter, with name “Local Area connection”. You can have multiple adapters if you have installed multiple network cards or have any logical adapters created. Click on the “Local Area connection” and you get a dialog box. In the Dialog box click on Properties, to go to properties for this adapter.
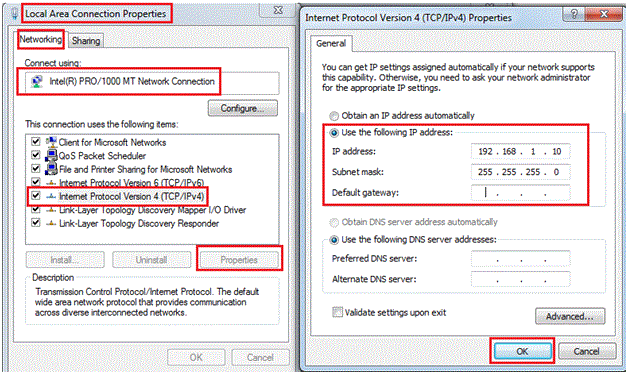
4. In the Properties dialog box, Under Network Tab, you see the Network Adapter name, in our case, it’s an Intel ® Pro / 1000MT Network Connection. Select the IPv4 option and Click Properties. In the next dialog box, you can configure the IP address as Dynamic (DHCP or automatically) or as Static.
5. Input the IP address and Subnet Mask. If using a router to access the Internet, give the Router’s IP address in Gateway and Click on OK.
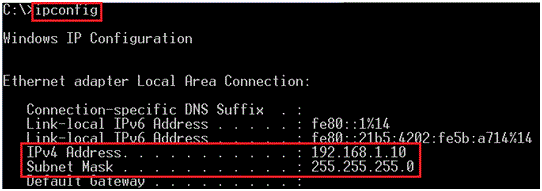
6. You can go to command prompt and run “ipconfig” to verify that the IP is configured.
7. If you intend to use Internet and to connect multiple devices the connection would look as in the below picture.
– The Internet Cable from your ISP, goes into your Router or Modem
– The Modem / Router is connected to your HUB
– Other computers are connected to the HUB
– While configuring the IP address on the computers, provide the gateway IP as IP of Router.
Free Practice Tests
- Free MTA Practice Tests and Exams
- Free MCSA Windows 7 Practice Tests and Exams
- Free MCSA Windows 8 Practice Tests and Exams
- Free MCSE and MCSA Windows Server 2012 Practice Tests and Exams
- Free CompTIA A+ Certification Practice Tests and Exams
- A+ Practice Test
- Free CompTIA CDIA+ Certification Practice Tests and Exams
- Free CompTIA Linux+ Certification Practice Tests and Exams
- Free CompTIA Network+ Certification Practice Tests and Exams
- Free CompTIA Project+ Certification Practice Tests and Exams
- Free CompTIA Security+ Certification Practice Tests and Exams
- Free CompTIA Server+ Certification Practice Tests and Exams
- Free CompTIA Storage+ Certification Practice Tests and Exams
- Free CCENT 100-101 ICND1, CCNA 200-101 ICND2, 200-120 CCNA Practice Exams and Tests
- Free Cisco CCNA certification practice tests and Exams Questions
- Free CCNA Security Certification Practice Tests and Exams
- Free CCNA Wireless Certification Practice Tests and Exams
- Free CCNA Voice Certification Practice Tests and Exams
- Free CCNP practice tests and Exams Questions
- Free CCIE Collaboration Certification Practice Tests and Exams
- Free CCIE Routing and Switching Certification Practice Tests and Exams
- Free CCIE Security Certification Practice Tests and Exams
- Free CCIE Wireless 350-050 Practice Exam


