How to Setup a Wireless Network Tutorial
How to setup a Wireless Network Step by Step guide
In today’s world we have many devices that need to communicate with each other and having wires for connecting each dive would be cumbersome. Also having the network wired would restrict the mobility for a person or device.
Thus the use of Wireless became popular; you can connect multiple devices and not be forced to sit in one place. Wireless provides the benefit of mobility and also avoids the unnecessary wiring that would otherwise fill your full room with cables.
We will do this demonstration in Packet tracer. Let’s take the below scenario, where we have two computers and a Wireless router.
To Setup the Wireless network, you need a wireless network adapter. In below diagram, we select the Linksys Wireless adapter and connect it to the device.
By default the Wireless Router will be having DHCP configured and enabled, which has the DHCP pool in the range of 10.10.10.100 to 10.10.10.149
The Computers are configured to receive IP from the DHCP Server.
PC0 is configured to get IP using DHCP and this gets the IP: 10.10.10.100
Similarly, PC1 get the IP address 10.10.10.101
The default credentials for the Wireless Router are as below:
SSID: default
Username: admin
Password: admin
The router IP is set to: 10.10.10.1
We will connect from the PC0 and using the web browser, we will configure the wireless router. In Packet tracer, Under Desktop Tab, Click Web browser and in the URL space give the IP of the Wireless Router.
Login with the credentials: admin / admin
In the GUI for the Router configuration, Scroll down and under the DHCP setting, select the “Disabled” Option.
Now, let’s change the configuration to be static and have the configuration as below:
Username: admin
Password: certilogy
Now under the Administration tab, change the default admin password for the router, so no one else can login.
We keep username as “admin” and change the password to “certilogy”
Once you save this setting and continue, you will again be prompted for the password as the credentials have changed and you need to provide the new credentials.
Username: admin
Password: certilogy
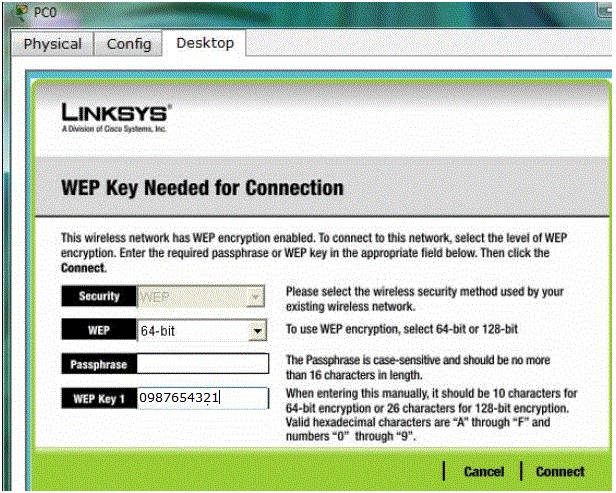
Now let’s change the SSID so we remember it as our Wireless Network (change it to “certilogy” and also change security mode to “WEP” and provide a key “0987654321”. Thus when any computer will try to connect to this Wireless Router, It will have to choose the SSID as “certilogy” and when asked for PIN / Key “0987654321”
Under the Wireless Security, select WEP as Security Mode and assign a Key.
Click on Save Setting and thus the configuration on the Wireless Router side is complete. Now we would need to configure the PC0 and PC1 with static IP address and then try to connect it to the Wireless Router.
PC0
PC1
Now Click on PC wireless on the Desktop Menu and Connect to the WIFI Network.
And Click on the WIFI Network and Connect to it with the WEP Key
We see that we have now successfully connected to the Wireless Network.
Free Practice Tests
- Free MTA Practice Tests and Exams
- Free MCSA Windows 7 Practice Tests and Exams
- Free MCSA Windows 8 Practice Tests and Exams
- Free MCSE and MCSA Windows Server 2012 Practice Tests and Exams
- Free CompTIA A+ Certification Practice Tests and Exams
- A+ Practice Test
- Free CompTIA CDIA+ Certification Practice Tests and Exams
- Free CompTIA Linux+ Certification Practice Tests and Exams
- Free CompTIA Network+ Certification Practice Tests and Exams
- Free CompTIA Project+ Certification Practice Tests and Exams
- Free CompTIA Security+ Certification Practice Tests and Exams
- Free CompTIA Server+ Certification Practice Tests and Exams
- Free CompTIA Storage+ Certification Practice Tests and Exams
- Free CCENT 100-101 ICND1, CCNA 200-101 ICND2, 200-120 CCNA Practice Exams and Tests
- Free Cisco CCNA certification practice tests and Exams Questions
- Free CCNA Security Certification Practice Tests and Exams
- Free CCNA Wireless Certification Practice Tests and Exams
- Free CCNA Voice Certification Practice Tests and Exams
- Free CCNP practice tests and Exams Questions
- Free CCIE Collaboration Certification Practice Tests and Exams
- Free CCIE Routing and Switching Certification Practice Tests and Exams
- Free CCIE Security Certification Practice Tests and Exams
- Free CCIE Wireless 350-050 Practice Exam


