DHCP Server Configuration in Windows Server 2012
DHCP Server Configuration in Windows Server 2012
This article explains how to install and configure DHCP Server on Microsoft Windows Server 2012. Free step by step guide for DHCP Server installation and configuration on Windows Server 2012.
A DHCP Server provides an automatic IP lease to its client in the network – you do not need to provide any IP details to the computer in a network environment.
It has two parts.
DHCP Server – Provides IP Lease to computers
DHCP Client – Sends request to DHCP Server for IP Lease
Default Lease Duration – 8 Days
Renew IP Lease Request – 85 % of Lease Expire – if DHCP server is not available, the lease expires
DHCP Work on two Ports: 67-68
DHCP Server should have Static IP address
You can define the scope for IP Lease
You can reserve or exclude IP address for devices
Let’s get started.
1. Login to the Test Server.
2. Now login onto the server, as shown below.
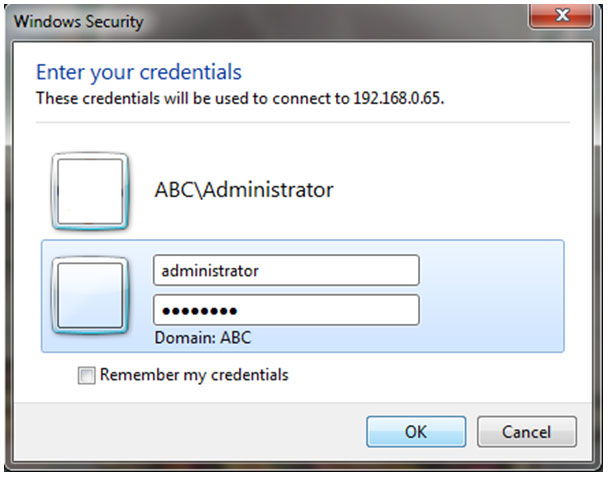
3. Enter your username and password (ABC\administrator) and click OK, as shown below.
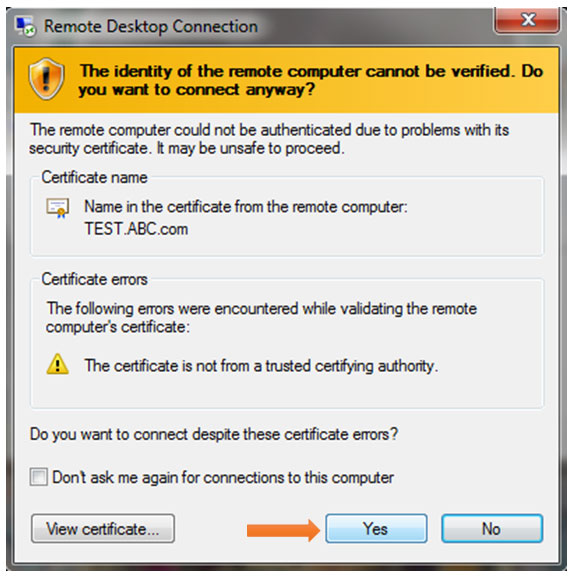
4. On the certificate verification window, click Yes.
5. The next window will show the Server desktop.
6. Open the Server Manager from the bottom left corner of the server desktop, as shown below.
7. Click on Add Roles & Features from the Server Manager Dashboard, as shown below.
8. Click on Next to begin the process, as shown below.
9. By default, Role-based or feature-based Installation is selected already, so simply click Next, as shown below.
10. On the next window, continue with default server (Test) selection and click Next, as shown below.
11. Select DHCP Server role and click Next, as shown below.
12. When you select the DHCP Server option, the Add Role & Feature Wizard will open. Click Add Features, as shown below.
13. You will be directed back to the Server Role screen, so click Next to continue, as shown below.
14. Click Next to continue, as shown below.
15. Click Next to continue, as shown below.
16. On the DHCP Server Role page, click Next to Continue.
17. Click Install to confirm the Installation Selection and install the DHCP Service.
18. You can see that installation is in process, as shown below.
19. Once the installation has finished, click Close, as shown below.
20. Open DHCP from the Tool menu in the top right corner of the Server Manager Dashboard, as shown below.
21. You can see that the DHCP server has been installed with Test.abc.com, as shown below.
22. Is is showing two versions – IP version 4 & 6. Currently, we are working on IP V4 standard.
23. To provide an IP lease, we have to create a Scope first – Scope is a pool of IP Addresses, the same pool from which we pick an address to assign to this Client computer. A DHCP Server can have single as well as multiple scopes.
24. To create Scope, right-click on IPV4, and click New Scope, as shown below.
25. New Scope Wizard will open, so click Next to Continue.
26. Give the Scope a Name & Description, then click Next to Continue, as shown below.
27. Provide the IP Range in Start IP Address & End IP Address and the Subnet, and length will be calculated automatically. Click Next to continue, as shown below.
28. In the Add Exclusion & Delay window, provide the IP range to exclude, and click Add, as shown below.
29. In the Lease Duration window, click Next to continue.
30. On the next window, click Yes I want to configure these options now, then click Next to continue, as shown below.
31. Give Router (Default Gateway) IP address and click Add.
32. On DNS Server option, click Next to Continue.
33. On WINS Server option, click Next to continue.
34. On Activate Scope window, select Yes I want to activate now, then click Next, as shown below.
35. Click Finish to complete the wizard.
36. Now you can see that the DHCP server has been configured. You can see the following information in the below screenshot:
- DHCP Scope
- IP Pool
- Exclude IP Range
37. In the Scope option, you can see the DHCP server option, as shown below.
38. If you want to assign an IP address permanently, for a particular device, you can use the Reservation option. By doing this, that device will have the same IP address every time it restarts. You can see that there is no reserved IP address in this instance, as shown below.
39. To assign an IP address, right-click on Reservation and click New Reservation.
40. Fill in the reservation information and click Add, as shown below.
41. Click Yes on the warning pop-up window, as shown below.
42. You can now see the reserved IP address for the printer.
This is how we can configure the DHCP Server.
Read more
- Windows Server 2012 System Requirements
- Windows 2012 Server Versions
- Installing Windows Server 2012 on Virtual Cloud
- File server configuration on Windows Server 2012
- Installing Active Directory in Windows 2012 Server
- Installation and configuration of printer server and network printer on Windows 2012 Server
- How to join Computers to a Domain in Windows Server 2012
- User Creation in Active Directory Windows 2012 Server
- How to Configure Group Policy in Windows Server 2012
- FTP Server Installation and Configuration on Windows Server 2012
- Disk Quota Management and Configuration on Windows Server 2012
- IIS Server Installation and Configuration on Windows Server 2012
- VPN Server Installation and Configuration on Windows Server 2012
- DNS Server Installation and Configuration on Windows Server 2012
- Setup Shared Folder Permissions on Windows Server 2012
- WSUS Server Configuration on Windows Server 2012


