FTP Server Installation and Configuration on Windows Server 2012
FTP Server Installation and Configuration on Windows Server 2012
This article explains how to install and configure FTP Server on Microsoft Windows Server 2012. Free step by step guide for FTP Server installation and configuration on Windows Server 2012
Let’s get started.
1. Login to the Test Server.
2. Now log on to the server, as shown below.
3. Enter your username and password (ABC\administrator) and click OK, as shown below.
4. On the certificate verification window, click Yes.
5. The next window will show the Server Desktop.
6. Open Server Manager from the bottom left corner of server desktop, as shown below
7. Click on Add Roles & Features from the Server Manager Dashboard, as shown below.
8. Click Next to begin the process, as shown below
9. By default, Role-based or feature-based Installation is selected already, so we will continue with default settings and click Next, as shown below
10. On the next window, continue with default server (Test) selection and click Next, as shown below
11. On the Server Roles window select the Web Server(IIS) option, as shown below.
12. As you click on Web Server (IIS) Option, it will open a pop-up window of Add Roles & Features Wizard. Click on Add Features to continue, as shown below.
13. Click Next to continue, as shown to below
14. Click Next to continue, as shown below, because we do not require any other features.
15. On the Web Server Role page, click Next to continue, as shown below.
16. Select the FTP Server option in the Select Role Service, as shown below.
17. Then select FTP Extensibility and click Next to continue, as shown below.
18. On the Confirm Install Selection window, click Install, as shown below.
19. You can see that the FTP Server Installation has been started.
20. Once the Installation of FTP Server is complete, click Close to finish the setup, as shown below.
21. After installing the FTP Server Role, open IIS Manager from the Start Menu, as shown below.
22. IIS Manager Console will open and you can see the contents page, as shown below.
23. Right-click on the Site Directory and select Add FTP Site, as shown below.
24. Enter the FTP Site Name, as shown below.
25. Click Browse and another window will open, where you will see many other directories, as shown below.
26. Click Make New Folder to create a new directory, as shown below, so that we can define the physical pathway of the FTP site.
27. Make New Folder and name it FTP (or any of your choice) and click OK, as shown below.
28. You can see that, by creating this folder, we have defined the physical pathway of the Content Directory. Click Next to continue, as shown below.
29. Assign IP address 192.168.0.65 – the Port will remain the same (21). In the SSL option, select No SSL and click Next to continue, as shown below.
30. In the next screen, select Basic under Authentication, select All User from the drop-down list under Allow Access to, and select Read & Write under Permission option, then click Finish to complete the Setup.
31. You can see that the FTP site is configured, as shown below.
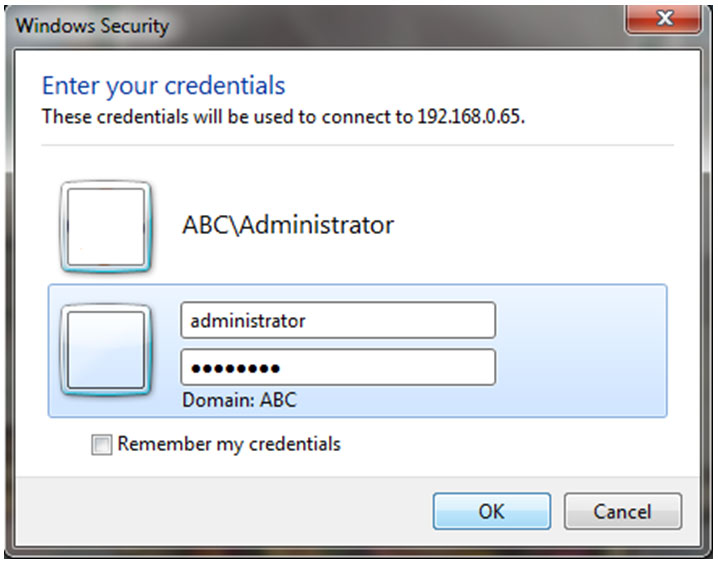
32. To check the FTP site functionality, go to Internet Explorer and type ftp://192.168.0.65 into the address bar, as shown below.
33. As you press the Enter key, you will be asked for your username and password, as shown below.
- Username: administrator
- Password: abc@1234
- Click on Logon button
34. The FTP site home page will open, as shown below.
35. To open the FTP site in Explorer, go to the View Tab and click Open FTP Site in File Explorer, as shown below.
36. The next window will ask for your login credentials, so enter your username and password and click Login, as shown below.
37. The FTP Site will be opened in a folder in Windows Explorer – you will see that the folder is empty, as shown below.
38. Right-click and create a New Folder, as shown below.
39. Name the folder Testing, as shown below.
40. Close this window and go to the C Drive, where you have create the FTP folder for placing content of FTP. You can see the Testing Directory which you have created in the FTP server, as shown below.
This is how we create an FTP Server on Windows 2012 Server.
Read more
- Windows Server 2012 System Requirements
- Windows 2012 Server Versions
- Installing Windows Server 2012 on Virtual Cloud
- File server configuration on Windows Server 2012
- Installing Active Directory in Windows 2012 Server
- Installation and configuration of printer server and network printer on Windows 2012 Server
- How to join Computers to a Domain in Windows Server 2012
- User Creation in Active Directory Windows 2012 Server
- How to Configure Group Policy in Windows Server 2012
- Disk Quota Management and Configuration on Windows Server 2012
- IIS Server Installation and Configuration on Windows Server 2012
- DHCP Server Configuration in Windows Server 2012
- VPN Server Installation and Configuration on Windows Server 2012
- DNS Server Installation and Configuration on Windows Server 2012
- Setup Shared Folder Permissions on Windows Server 2012
- WSUS Server Configuration on Windows Server 2012


