Downloading, installing and configuring GNS3
Downloading, installing and configuring GNS3
GNS 3 is a Graphical Network Simulator that is free and open-source under the GPL license. It simulates complex networks in graphical format over the PC giving the same look and feel of operating a real-time complex network. Through this program, you can boost your networking knowledge and get prepared for Cisco networking examinations such as CCNA, CIPE and more through designing and configuring virtual networks on Windows, PC and Macintosh. In order to know more about GNS 3 and how to use it, this tutorial shall help you out. Here are the steps of downloading, installing and configuring GNS 3 on your operating system:
- Go to http://www.gns3.net to download GNS 3. Once on the website, click the Download link found at the top right
 Now that you are in the Download page, we would recommend you downloading the all-in-one package as shown below. This is ideal for beginners and professionals alike:
 Once downloaded, run the setup wizard and click Next
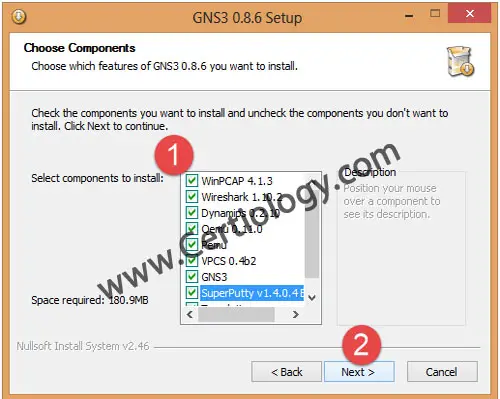
 You would now be asked to manually select which components to be installed. We would recommend checking all components and installing them.
 Once the installation process is initiated, there would be a series of installation wizards for the checked installation components in 4th step. Simply click Next to follow onscreen instructions of installing Dynamips, WinPCAP, and Wireshark, etc. Once all of the components get installed, you would get the following screen. Check Start GNS3 and click Finish
 When you start GNS 3 for the first time, you would see a setup wizard like the following mentioning what you have to do in steps to use GNS 3. In order to use GNS 3, you need to have a valid OS images, such as Cisco iOS, Qemu, PIX, etc. Click OK
 Once you are inside, you would see a range of options on your left such as Routers, Switches, End Devices. These would stay disabled unless you load an IOS image from Cisco for these routers. You can only drag and drop these routers to the working area in the top middle once you load an IOS image and once these routers turn green.
 To load an IOS image file from Cisco or other providers, click Edit and then IOS images and hypervisors
 A new dialog box would appear asking you for the location of the IOS image. First locate the image file, then assign the default RAM and click Save.
