How to Backup Cisco Router IOS
Cisco IOS Backup and Restore Process
As we live in a world of uncertainty, there could be times when you have some issues in your network and you may lose important configuration of your network devices. Router being a very important and integral part of the network store many configurations.
You may also encounter issues with the Router OS i.e. the IOS while doing some upgrade or some other failures. This article will help you understand how to backup and restore the IOS.
We will be backing up the IOS to a TFTP server and use the same backup image to restore the configurations on the router. Thus connectivity between the router and TFTP server is important.
The IOS is the core of the router functionality. There are different types of memory on the Cisco device and the flash memory stores the Cisco IOS.
The Flash where IOS is stored is non-volatile thus the data is safe even in an event like power off. As the IOS is important software, having a backup of it is pretty much a requirement in today’s organizations.
In this tutorial we will be storing the backup on TFTP server. Below are some important points related to TFTP.
- TFTP stands for Trivial File Transfer Protocol
- It is a protocol through with a client can get or some file to a remote host
- It is lightweight and authentication less in nature
- Using TFTP you cannot list or delete / rename files. TFTP can be used only for reading and writing files to and from a TFTP server.
- TFTP works on transport layer protocol UDP at port number 69.
Now, let’s demonstrate the entire process of backup and restore of Cisco IOS. We will use the Cisco Packet Tracer application for this demonstration.
You can also use an actual TFTP server from SolarWinds or Cisco or Whats Up Gold or any TFTP server available in the market along with your actual Cisco Router. The actual software needs to be installed on a PC, which is connected to the router via console.
In our demonstration as we are using Packet Tracer, we already have an inbuilt TFTP server running.
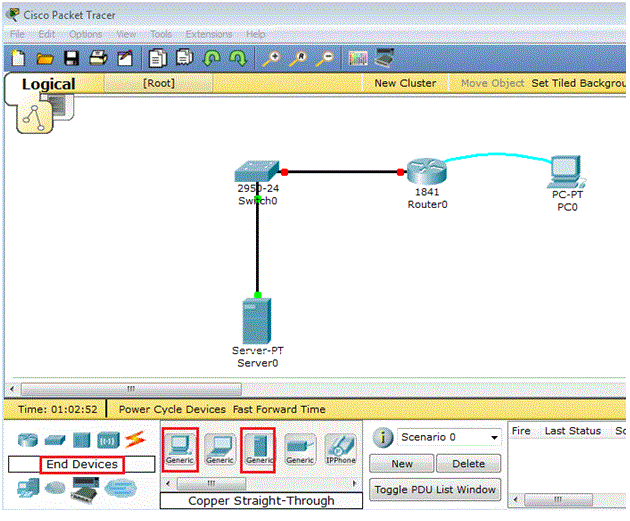
Once you open Packet tracer, at the Left side bottom you see some devices represented with relevant icons.
Choose End Devices and choose a Generic Server and Desktop. Drag and drop these to the work space.
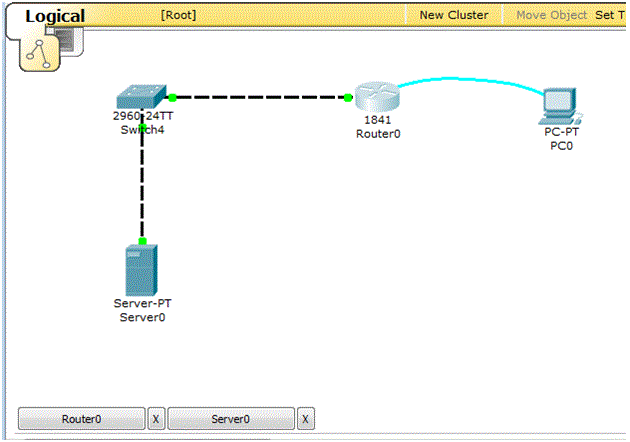
Similarly, Choose a Router and a Switch and place it as shows in the above topology.
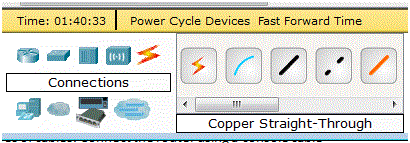
Now we need to have the cabling done. Click on Connections on Left bottom and you will see different types of cables. Connect the router using a console cable
Connect the devices, Router fa0/1 to switch fa0/1 using Straight-Through Cable and the Switch fa0/2 to fast Ethernet of the Server.
Connect the Router’s Console with the PCs RS232 using a console cable, which is represented by the Blue color.
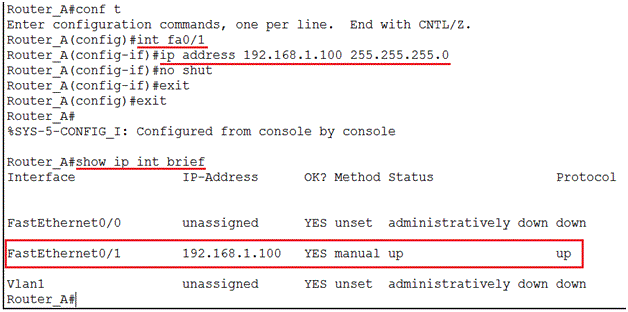
Now Lets’ have the connectivity working, and thus need IP addressing.
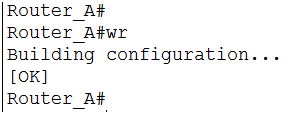
1. Assign the Router’s fa0/1 an IP address of 192.168.1.100 with mask of 255.255.255.0. Save the configuration using the command “wr”.
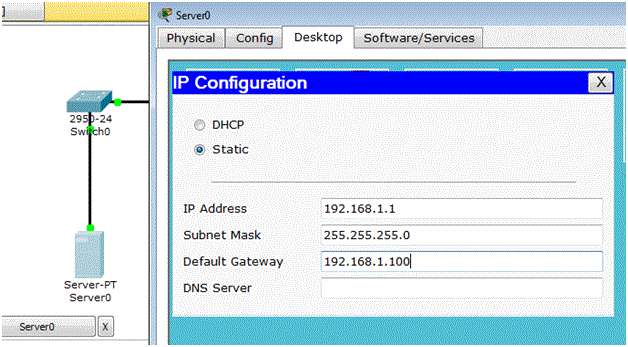
2. Now configure the Server with a Static IP address of 192.168.1.1 with subnet mask 255.255.255.0 and gateway IP address as 192.168.1.100 (Router’s IP address).
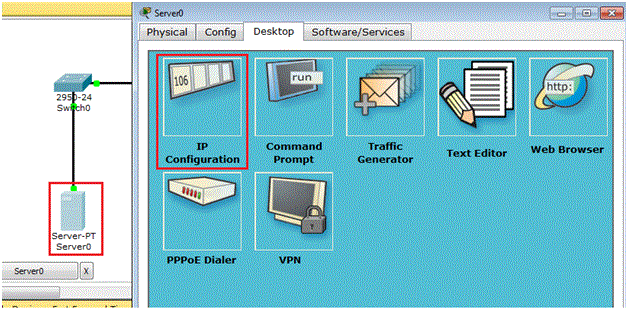
Click on the Server “Server0” and then under the Desktop Menu select “IP Configuration”
3. In the IP configuration window, assign the IP address as mentioned above
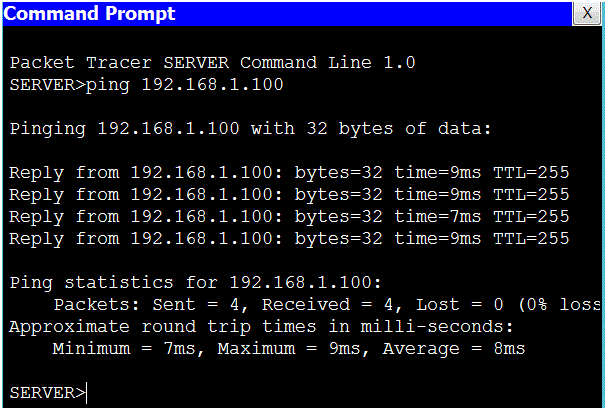
4. Now check connectivity between Server and router using Ping.
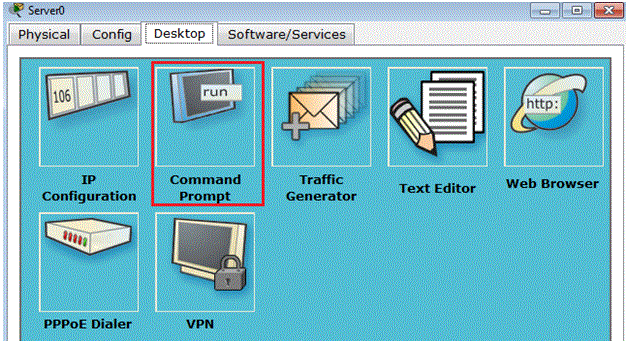
Click on Server and under the Desktop Tab, Select Command Prompt.
Also test the connectivity from the router to the TFTP Server (Server0)
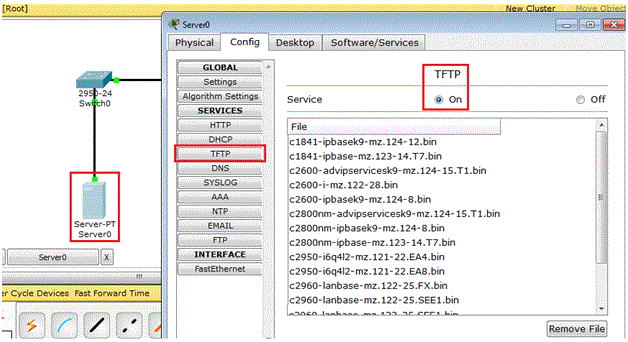
5. Now check if the TFTP Server is running on the Server0. Click on the Server and under Config Menu; click TFTP on the left buttons. We see that TFTP is marked as “On” and we also see a list of IOS images in the list. These are provided by default for test purpose and learning.
When we backup our IOS, it will be seen in this list.
6. Now click the PC0, which is connected to the Router using console. Under Desktop Menu, click Terminal.
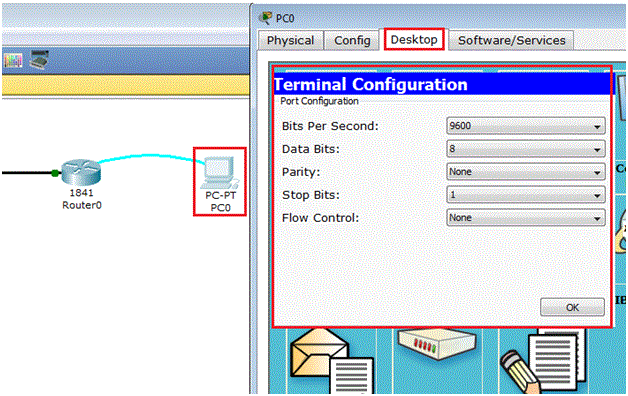
7. We see the Terminal configuration settings, no need to change them. Keep them as it is and Click on OK. You will get the console access to the router.
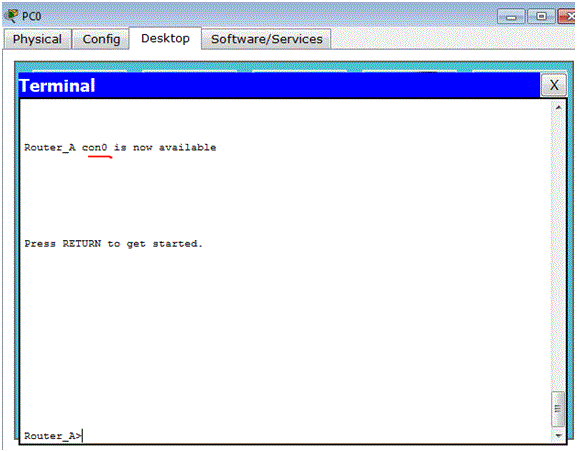
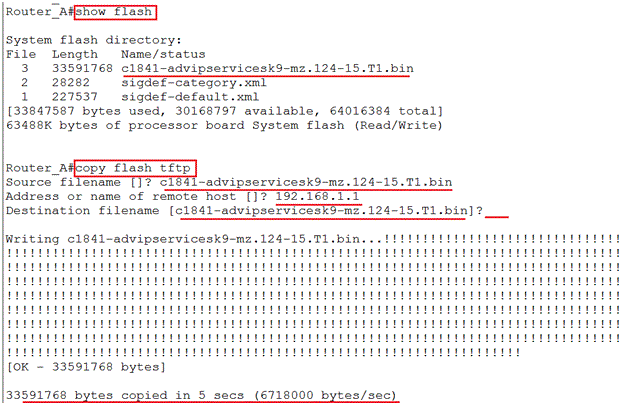
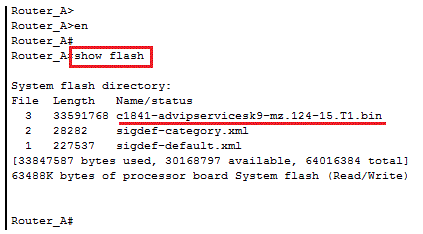
8. Go to enable mode and run the command “show flash”. Do note the name of the IOS image. In our case the image file is: c1841-advipservicesk9-mz.124-15.T1.bin
9. Now we will take a backup of this flash to the TFTP Server. In enable mode, run the command: “copy flash tftp”, which means to copy the flash to tftp server. You will be prompted for the source and destination file name and the address of the remote host, i.e. the TFTP server where the flash needs to be saved.
In the above screenshot we see:
Source filename:
Remote host: 192.168.1.1 (The IP of our TFTP server)
Destination filename: The name in the [] square bracket is the default, thus we left it as it is.
10. One the flash is copied to TFTP server, we can go and verify the same on the TFTP Server.
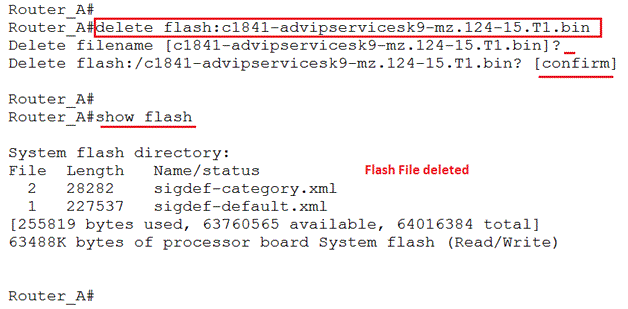
11. Now we will delete the flash from the Router and then check to see if any available flash in the router. We see the flash is deleted and no .bin files seen when checked with “show flash”.
12. After deleting the Flash, the router can function till a reload is done. Once the reload is performed, and when the router boots up it cannot find any information in flash and thus will take you to ROMMON Mode.
RESTORE FROM ROMMON MODE
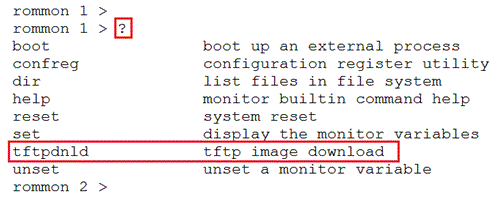
1. If you use the question mark (?), you will know the command that can be run in the ROMMON MODE. We need to use the “tftpdnld” (TFTP Download) command.
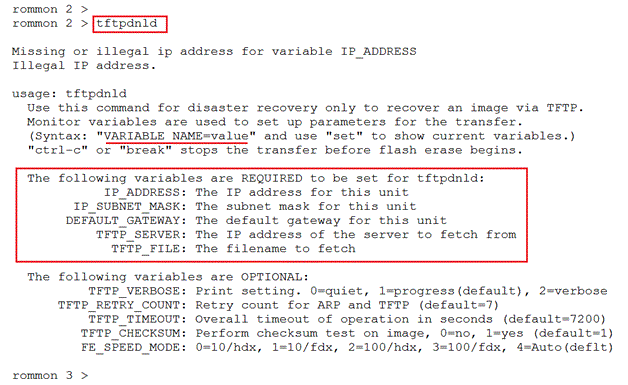
2. On the ROMMON mode prompt, type “tftpdnld”. You see a set of information that needs to be set now to assign an IP address, Gateway, TFTP file name, TFTP Server name etc.
NOTE: These commands are CASE SENSITIVE.
3. The description of each command is mentioned in the above screenshot.
i.e. IP_ADDRESS is a new IP address for the Router, IP_SUBNET_MASK is the subnet mask
4. Finally after assigning the required details run the command “tftpdnld” again and then when prompted for continuing, type “y”. You will see the message “program flash location <hexcode>”
5. Then run the command “reset” and you will see the flash image getting decompressed.
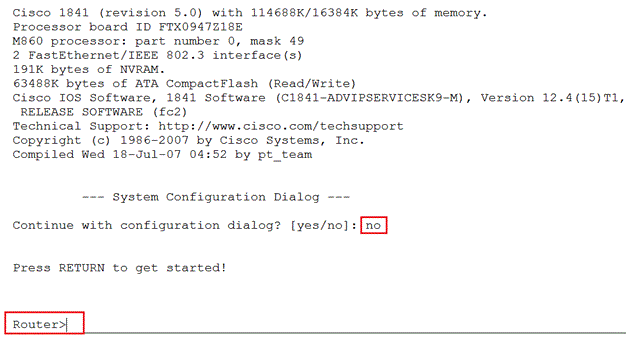
6. Once the image is decompressed, you get the prompt to configure the Router again using wizard. You can choose NO and then configure the router using CLI commands.
7. So, with the above steps, we restore the Flash from ROMMON Mode.
BACKUP and RESTORE CONFIGURATION FILES
1. In this section, we will take a backup of the configuration of the Router and then restore the configuration. For demonstration we will continue to use Packet tracer.
2. Imagine someone changed the configuration of your existing ( running configuration) or the router rebooted and the running configuration was not copied to startup-config.
3. In such a situation if you have already taken a backup of the running or startup configuration, you can restore the configuration within few minutes.
4. Consider our configurations in place and we want to take a backup of it. In this demo we will just change router name and test.
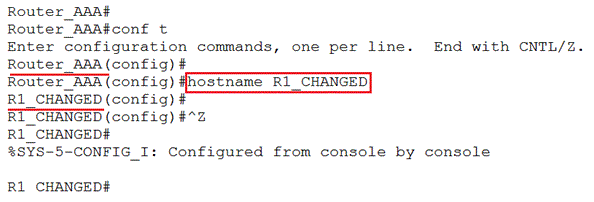
5. We are doing the configuration and as per our requirement we changed the router name to “Router_AAA”
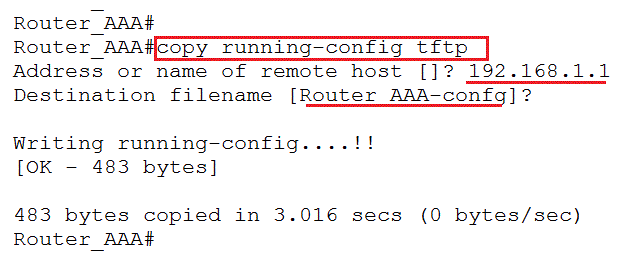
6. Now we want to backup the current running configuration to TFTP. Run the command :
#copy running-config tftp
Give the TFTP server IP when prompted for Remote Host and for destination name, give the name with which you want to store the running config.
7. Similarly you can also backup the startup-configuration.
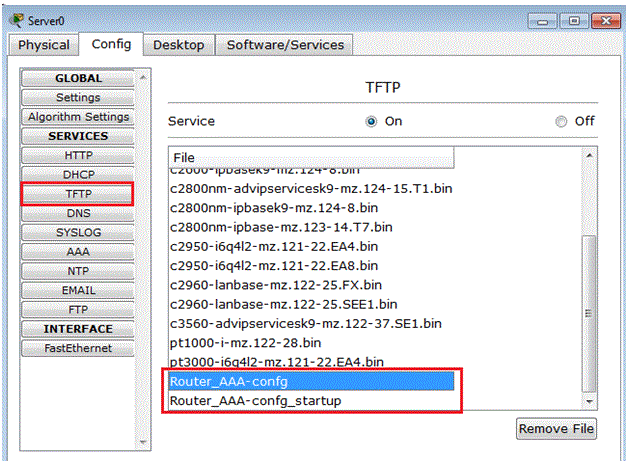
8. Go and check the TFTP Server, you should be able to see the files.
9. Now we will change the hostname and then restore the config again to have the old hostname. (This is just for test; similarly you can get back the entire configuration that was backed up).
10. Now that we see the router name is changed (some configurations changed, we lost old configuration). Let us restore the old configuration.
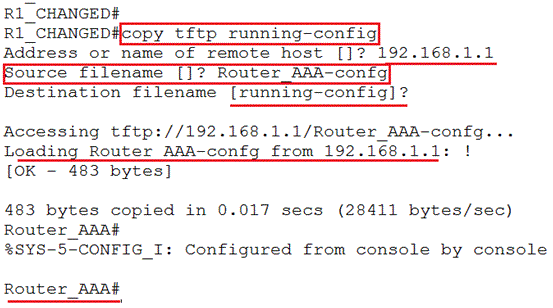
11. On the CLI, run the command “copy tftp running-config” and then choose the file you want to use to restore the configuration. As we stored our running config in “Router_AAA-confg”, we use that file and restore the old configuration.
12. You see in the above screenshot that after restoring the configuration, the hostname is again changed to Router_AAA. Thus we restored the configuration.
Read more
- What is IOS
- Router Memory
- Router Startup
- Understanding of Router Prompts
- Help Features of Router
- How to Configure Hostname, Clock and set banner on Cisco Router
- Configuring Fast Ethernet and Serial Interfaces on Cisco Router
- How to save router configurations
- How to set passwords on Cisco router
- Cisco Router Password Recovery
- Router IOS Commands and Basic Router Configuration
- Access Lists

