Print Gridlines in an Excel Worksheet
Print in Excel: Print Gridlines in a Excel Worksheet
In this tutorial, you are going to learn about how to setup your Excel sheet for printing. You will learn how to set margins, setting the printing preferences, selecting the printer and so on.
Print a Worksheet
To print a worksheet in MS Excel, follow the following steps.
1. On the File tab, click Print or press Ctrl + P (keyboard shortcut).
2. You may also preview the other pages that will be printed by clicking ‘Next Page’ or ‘Previous Page’ at the bottom of the print dialog window.

3. To print the worksheet, click the Print button.
Custom Print
MS Excel provides you the flexibility to select your own printing preferences. Therefore, instead of printing the entire worksheet, you can also print the select range. To do this, follow the following steps.
1. Select the range of cells you want to print
2. Press Ctrl + P or use File Menu, to open Printer Options
3. Under Settings section, select Print Selection
Multiple Copies
MS Excel provides you to print multiple copies at a time. To print multiple copies, follow the following steps.
1. In Print Options, set the Copies value to your desired number.
2. If your sheet contains multiple pages, then you can also select between Collated and Uncollated. In collated mode, each copy will be printed in full and then the next copy will start printing whereas in uncollated mode, printing will take place page-wise, means, all copies of page 1 will print first then page 2 and so on.
Orientation
You can also select your desired orientation of your sheet. For example, if you have a sheet comprising of 10 columns and 10 rows. Now the column width of 10 columns will not fit on Portrait mode therefore you will need to set the orientation to Landscape mode.
Similarly if you have more data row-wise and less data column-wise, then the ideal mode would be Portrait mode.
Desired orientation mode can be selected from the print options.
Page Margins
You can also set the pre-defined page margins that are fit for your purpose. To select a Page Margins in Print Options, follow the following steps:
1. Under the Print Options, select your desired margins (Normal, Wide or Narrow) from the Margins list.
2. You may also set the margins by clicking ‘Show Margins’ icon at the bottom right of the window and can drag the margin lines to manually set the page margins.
Scaling
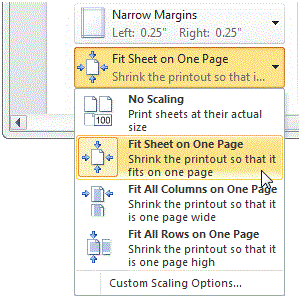
MS Excel also provides the flexibility to adjust the scaling of contents according to the selected sheet. From setting all columns to one sheet to setting all rows to one sheet and even setting both rows and columns on a single sheet.
1. To set all contents on single sheet, select ‘Fit Sheet on One Page’ from the Scaling list.
More Related Articles For You
- Important Terminologies in Microsoft Excel
- Working with Rows, Columns and Cells in Excel
- Working with Ranges in MS Excel
- Formulas and Functions in MS Excel
- Ribbon in MS Excel
- Workbook in MS Excel
- Formatting Cells in MS Excel
- Templates in MS Excel
- Data Validation in MS Excel
- Excel Keyboard Shortcuts
- Protecting a Workbook in MS Excel with Password
- How to Share MS Excel Data
- Count and Sum Function in Excel
- Logical Functions in Excel
- Date and Time Function in Excel
- Worksheet in Excel
- Find and Select in Excel
- Cell References in Excel


